
Tuesday, December 16, 2008
Sunday, November 9, 2008
Week 20 SIP
Hi all this is the last week of SIp, well actually its already over. Hope you all enjoyed you SIP and well its time for reports to be handed up and for school to resume.For this round I will be touching on undefined organic elements solidfying agents
Undefined organic elements include protein hydrolysates, coconut water, yeast extracts, activated charcoal, malt extracts, ground banana, orange juice and tomato juice. The addition of activated charcoal to culture media may have a beneficial effect. It can stimulate cell growth by its ability to bind to toxic phenolic compounds produced during culture. Activated charcoal is usually added to the media, acid wash prior to addition at concentration of 0.5% to 3.0%.
Agar is the most commonly used geling agent for preparing semisolid and solid plant tissue culture media. Advantages of agar: it forms a gel when mixed with water that melts at approximately 60-100 degrees celcius and solidifies at approximately 45 degrees celcius. It also does not react with media constituents and will not be digested by plant enzymes. The firmness of the agar gel is controlled by the concentration nad brand of agar used. Typical concentration used is 0.5% to 1%; the concentration give a firm gel at the pH lvels typical of plant culture media.
Another geling agent would be gelrite, it is a product of bacteria fermentation and should be used at 1.25-2.5 g/L, resulting in a clear gel which aids in detecting contamination.
Johan
TG02
0606637G
Monday, November 3, 2008
Week 19- 2D-SDS-PAGE & 2D-Zymography
Hello guys...One more week to go before the end of SIP/MP. In my final post, I shall mention on the last phase of my project, which is the running of 2D-gel electrophoresis. The 2D-gel electrophoresis will be divided into the 2D-SDS-PAGE and 2D-Zymography. For those who are still wondering what zymography is, please refer to Benjamin's entry for more information. Before I continue, let me define these two gel electrophoresis techniques.
2D-SDS-PAGE: It is an electrophoretic technique which uses a SDS-polyacrylamide gel to separate proteins based on molecular weight only (function of SDS molecules).
2D-Zymography: It is an electrophoretic technique which makes use of the same principle of how 2D-SDS-PAGE works and uses a SDS-polyacrylamide gel co-polymerized (in simpler term: combined) with a protein substrate, gelatin. The addition of gelatin into the gel is to detect protease activity, which is our main interest.
Following extraction of periplasmic proteins by chloroform shock (recall from my previous post), we shall screen for the isolate of S. maltophilia where its periplasmic proteases exhibit the highest protease activity. This can be achieved by running the 1D-zymography which is thoroughly elaborated by Benjamin's post. On the 1D-zymogram gel, protease activity will be visualized as clear bands (transparent bands). The S. maltophilia isolate(s) which has the most number and largest clearings will most likely be our isolate of interest and we will culture this isolate for the 2D-SDS-PAGE and 2D-zymography.
The reason why we are detecting these periplasmic protease activities is because these proteases might be potential virulence factors of S. maltophilia which cause diseases in humans. Hence, it is of great significance that we identify these periplasmic proteases and hopefully in the years to come, new vaccines can be created to target against these virulence factors.
The difference between 1D-zymography and 2D-zymography is that in 1D-zymography, proteins are separated based on molecular weight only. However in 2D-zymography, proteins are separated based on 2 dimensions, where the first dimension separation is isoelectric focusing (IEF), where proteins are separated based on their isoelectric points. The second dimension separation is SDS-PAGE, where proteins are separated based on their molecular weights. On the 1D-zymogram gel, proteins will appear as bands. On the other hand on the 2D-zymogram gel, proteins will appear as spots. Periplasmic protease activity will be visualized as clear (transparent) bands on the 1D-zymogram gel as compared to the 2D-zymogram gel where periplasmic protease activity will be visualized as clear spots. Logically speaking, proteins undergoing 2 dimensional separations will be more resolved as comapred to 1 dimensional separation.
In summary...
1D-zymography: 1st dimensional separation- SDS-PAGE
Proteins are separated based on their molecular weights (MW).
2D-zymography: 1st dimensional separation- Isoelectric focusing (IEF)
Proteins are separated based on their isoelectric points (pIs).
2nd dimensional separation- SDS-PAGE
Proteins are separated based on their molecular weights (MW).
In 2D-gel electrophoresis for our research application, it is necessary to run the 2D-SDS-PAGE and 2D-zymography together on the same time. This is because we would want to detect the region of periplasmic protease activity on the 2D-zymogram gel and match that region to that on the 2D-SDS-polyacrylamide gel. If there is protein spots on the 2D-SDS-polyacrylamide gel corresponding to the location of the clearings on the 2D-zymogram gel, it will most likely imply that those protein spots are the periplasmic proteases accounting for the clearings on the 2D-zymogram gel.
Ultimately, the main highlight of our project is to obtain the identity of the periplasmic proteases. However before this can occur, we must first develop and optimize our 2D-zymography protocol, which is the gist of our project and it is still ongoing. Wish us luck and all the best for the last lap of SIP/MP...!!! :)
Name: Tan Han Yang
Class: TG01
Admin no. : 0606190G
Saturday, October 25, 2008
Running 1 1D-Zymogram - Week 18
Hi people, time really flies. This is already week 18 and there are 2 weeks left before the end of SIP/MP. This week, i will share with you what is a 1D-Zymogram and how to run it based on the protocol that my partner and I have developed.
Principle of Zymography: Zymography is an electrophoresis technique that is used in the detection of protease activity under non-denaturing conditions. It is performed on a zymogram gel, which incorporates the use of a substrate that is copolymerized with polyacrylamide gel. Proteases that catalyze Gelatin , Caesin or Fibrin as a substrate will show up as clearings against a dark blue background after staining with Coomassie brilliant blue.
The use of zymography encompasses the use of many different buffer systems. Sample buffer is used in conjunction with the protein sample for a few purposes. Sample buffer helps to control pH, controls sample/ion movement, increase sample viscosity and density (aid in loading into sample wells), provide tracking dye (monitor seperation during electrophoresis), provide denaturing molecules (SDS to linearise proteins) and provide chemical reducing agents (control sample chemistries). Another buffer system is the running buffer system. Sample wells are filled with running buffer which contains ions that helps in the constant migration of proteins towards the bottom of the well, when voltage/current is applied. The 3rd buffer system that is used is the renaturation buffer system which helps to renature (allows protein to fold back) to their tertiary structure in order for it to exhibit enzymatic activity on the gelatin substrate of the zymogram gel. Proteins in its linearised state do not exhibit enzyamtic activity (linearised by SDS) and requires renautration using renaturation buffer to restore its enzymatic activity. The fourth buffer system that is used is the developing buffer system which is used to develop the zymogram gel after addition of renaturation buffer. Developing buffer allows protease to exhibit enzymatic activity on the zymogram gel (digest gelatin).
The gel is stained with Coomassie Brilliant Blue stain (Biosafe Biorad) to visualise the protease activity, which will stain the whole zymogram gel blue in colour. The zymogram gel is then destained with MilliQ water to remove excess commassie blue and proteins that exhbit enzymatic activity will produce clearings against a dark blue background. Coomassie Brilliant Blue stain has high affinity to proteins present on the 10% gelatin zymogram gel. Gelatin is considered a protein substrate as well as the periplasmic proteins that is present on the zymogram gel after seperation by electrophoresis. Coomassie Brilliant Blue stain binds tightly to both of these proteins, hence, the gel appears blue in colour. Periplasmic proteins which exhibits protease enzymatic activity on the gel, will digest the gelatin substrates. Hence the region of the zymogram which is digested lacks proteins. Without proteins, Coomassie Brilliant Blue stain will have poor affinity with the gel and can easily be destained/washed off in the presence of destaining solution/DI water.
1D-Zymography is an electrophoresis technique that seperates proteins 1 dimensionally based on molecular weight on the zymogram gel. Proteins are linearised with SDS and carry an overall negative net charge. Larger proteins have more SDS bound to it and smaller proteins have less SDS bound to it. This ensure that proteins have a constant mass to charge ratio of 1.4g SDS/protein. When an electric current is applied, proteins will migrate towards the anode (+) of the gel. Larger molecular weight proteins will migrate slower and appear at the bottom of the gel. Smaller molecular weight proteins migrate faster and appear in higher regions of gel. Proteins that exhibit enzymatic activity on the gelatin substrate, will appear as clearings against a dark blue blackground after destaining in the destaining solution.
Methods
Sample Preparation
1. Add/pipette in 10 ul of SDS-Sample buffer into each of the 11 eppendorf tubes ( 11 tues for 11 isolated)
Reason: Equal volume of sample buffer added to equal volume of sample is important, as it allows equal amount of SDS to bind to equal amount of proteins to have a constant mass to charge ratio of 1.4g SDS/ protein.
2. Add/Pipette in 10ul of Sample + DI water (periplasmic proteins) into each of the 11 eppendorf tubes
Reason: DI water is added to dilute the samples if concentration is deemed to be too high
The amount/volume of periplasmic proteins are to load, are calculated by dividing the mass of protein (constant fixed at 10ug) with the concentration of protein obtained using Bradford assay. DI water is used to top up the remaining volume to 10ul. Total volume of sample + sample buffer + DI water should be 20 ul. 20ul is the maximum capacity of well
3 Centrifuge the eppendorf tubes for 7 seconds at 16 000xg
Reason: This is to prevent air bubbles from forming during pipetting and ensures homogenous mixing of sample with the sample buffer
Prepare Running Buffer
1. Add 100ml of TGS running buffer (10X) to 900ml of DI water using a measuring cylinder
Reason: This is to dilute the TGS buffer 10X. It is more practical to have 1 bottle of concentrated TGS rather than 10 bottles of diluted TGS buffer as it saves space
Assembly of Xcell SureLock Mini-Cell
1. Fill Upper and Lower Buffer Chamber with 1X TGS running buffer
Reason: TGS running buffer contains ions for migration of protein when applied to an electric field
2. Gently remove the gel comb and peel tape off from gel cassette
3. Insert the gel comb into the Xcell SureLock Mini-Cell and lock it into place using the Gel Tension Wedge.
4. Load 20ul of sample into the each of the wells (* Load from 2nd well onwards as 1st well is for the protein ladder )
5. Load 8.0ul of protein ladder into the 1st well of the Zymogram gel
Reason: Protein ladder helps to track the migration of protein during electrophoresis
6. Close cover of the Xcell SureLock Mini-Cell
Reason: Ensures that electrophoresis can begin
Electrophoresis
1. Switch on the power supply and ensure that the electrodes are connected
2. Run the gel at 120 V for 90 minutes ( The optimal voltage for running the gel is 120 volts. Running the gel at very high voltages (e.g. 200 volts) leads to the generation of intense heat, which may denature the proteins. Running at too low voltages may result in long duration before electrophoresis is complete. )
Removal of gel after electrophoresis
1. Unlock the Gel Tension Wedge and remove the comb from the Xcell SureLock Mini-Cell
2. Use the gel knife to separate the plates and extract the 10% Zymogram gel and placed on plastic tray
3. Rinse the gel with DI water
Reason: To wash away the TGS running buffer and SDS
4. Add 100ml of renaturation buffer (contains Triton-X and detergent) and incubate with gentle agitation for 30 minutes
Reason: This is to allow proteins to renature back to its teritiary structure
5. Decant the renaturation buffer
6. Add 50ml of Developing buffer and incubate with gentle agitation for 30 minutes
Reason: This is to allow proteases to exhibit enymatic activity on the Zymogram by digesting the gelatin
7. Decant the Developing buffer
8. Add 50 ml of Developing buffer and incubate at 37°C overnight for 20 hours
Reason: This is to allow proteases to exhibit enymatic activity on the Zymogram by digesting the gelatin. The purpose of developing twice is to allow the proteins to adapt to the gradual change from renaturation to developing buffer.
9. Decant the Developing buffer
10. Add Biorad Biosafe Coomassie Blue G-250 stain and incubate with gentle agitation overnight
Reason: Ensure that the Zymogram gel is fully submerged in the stain. Biorad Biosafe Coomassie Blue G-250 stains the entire Zymogram gel blue in colour
11. Decant Biorad Biosafe Coomassie Blue G-250 stain
12. Add MilliQ water (destaining solution) and incubate with gentle agitation overnight
Reason: This is to destain the gel and only areas that protease have exhibited enzymatic activity on the gel will appear as clear bands against a dark blue blackground
Timescale
The whole proccess of running a 1D-zymogram takes about 3 days. 1 day is attributed to the actual electrophoresis, 1 day for staining and another day for the destaining proccess.
The results of a 1D-zymogram
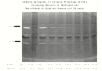
Picture is taken from: astro.temple.edu
The quantity and size of clearings (transparent bands) indicate the amount of protease enzymatic activity on the gelatin substrate of the gelatin gel. S. maltophilia of different isolates can be screened using this methodology to determine which isolate produce the most interesting (most quantity and largest clearings) on the 1D-Zymogram. This isolate can then be further analysed using a 2D-Zymogram.
Sorry for the long entry guys, hope it won't bore you. Thanks alot, and enjoy the last 2 weeks!
From: Benjamin Ma Xianwei
Class: TG01
0606181F
Sunday, October 19, 2008
Week 17 SIP
Hi
This week its my turn to post a blogging post of my experience in my lab. For this week I am attached to my company’s satellite lab. A satellite lab is like an assistant towards the main lab handling samples collected from clinics. However a satellite lab is limited in terms of the number of test that can be done. This is due to a much smaller space to place adequate number of machines. Some machines that is used is also different from the main lab.
However I will be posting about a test, which I did in microbiology department, which I was posted into about 3 weeks ago. It is a routine test to detect the presence of gram-positive Staphylococcus aureus. Staphylococcus aureus is one of the most frequently encountered pathogens in clinical specimens. The rapid distinction between this species to other less virulent Staphylococci is very crucial and vital for an appropriate patient management. The test for the detection of free coagulase production permits the identification of staphylococcus aureus. The test reagent used is PASTOREX STAPH-PLUS to perform the coagulase test.
PASTOREX STAPH-PLUS is a rapid slide agglutination test for the simultaneous detection of the fibrinogen affinity, protein A and the capsular polysaccharides of Staphylococcus aureus.
The principle of PASTOREX STAPH-PLUS test reagent was designed to allow simultaneous detection of the following 3 components:
1 Fibrinogen affinity factor, also referred to as bound coagulase or “clumping factor”
2Protein A, which possesses an affinity for the crystallisable fragment(Fc) of gamma immunoglobumins (IgG).
3 Capsular polysaccharides of Staphylococcus aureus.
PASTOREX STAPH-PLUS reagent is made of latex particles sensitized by fibrinogen and IgG as well as specific monoclonal antibodies raised against capsular polysaccharides of Staphylococcus aureus. The combination of fibrinogen, IgG and anti-capsular monoclonal antibodies in the same reagent allows the recognition of highly encapsulated strains of Staphylococcus aureus as well as poorly encapsulated strains. For highly encapsulated strains, anti-capsular polysaccharides antibodies agglutinate the bacteria. For strains that have lost their polysaccharide capsule, the bacteria are agglutinated by fibrinogen and IgG.
Steps and procedures involved.
1 Place a drop of PASTOREX STAPH-PLUS
2 Inoculate a pure strain of bacteria colony from an agar plate and placed onto a clean glass slide.
3 Mix the reagent and the bacteria colony well
4 Observe for any agglutination. If there is agglutination, it means the bacteria colony is gram-positive Staphylococcus aureus.
Ivan Ng
TG01
Sunday, October 12, 2008
Week 16 SIP
Hi
I have been attached to cytology for 3 weeks.
What is cytology?
Cytology is the study of cells obtain from bodily fluids.
The cytology department receives any fluid from the body such as CSF, aspirates, FNA, smears from urinary tract, reproductive system and so on. They split all the specimens into 2 categories, gynaecological and non-gynaecological. The gynae category means Pap smears (female reproductive tract from vaginal to cervical smears). Non-gynae is everything else.
Pap stands for Papanicolaou stain. It screens to detect premalignant and malignant tissues, mainly from the cervix.
How to take a Pap smear?
I "tooth-brush" like device is used to scrap cells from the opening of the cervix. The medical officer will rotate 360 degrees to gather cells from as large area as possible (to prevent false negative because some areas may not be scrapped). Then they will be smeared onto a slide and stained using the Pap staining method.
Instead of the usual H&E staining, gynae staining is slightly different. They have modified Eosin Azure instead of the normal Eosin, orange G stain and harris haematoxylin. Orange G stains for keratin, and the eosin is special because gynae cells cannot be stained by normal eosin. (I don't know why.)
The test aims to detect cells which are potentially pre-cancerous. The newest classification of degree of malignancy of gynae cells is called Bethesda system.
1. Atypical glandular cells (AGC)
2. Atypical squamous cells of undetermined significance (ASCUS)
3. Low grade squamous intraepithelial lesion (LSIL)
4. High grade squamous intraepithelial lesion (HSIL)
5. Squamous cell carcinoma
It is recommended that females who have had sex undergo regular Pap smear testing, once a year to once in 5 years. If the results are abnormal, they need to do a confirmatory test, about 6months later again (the same test). Other confirmatory test include colposcopy and HPV DNA testing. I am unsure how these are performed.

http://www.medskul.com/gallery/data/519/Faces_of_high_grade_squamous_intraepithelial_lesion_HGSIL_or_HSIL_.jpg
The above picture shows HSIL.
The main things to look out for to confirm malignancy is to observe the nucleus.
They MUST have these characteristics:
1. Enlargement of nucleus
2. Increase in chromatin density
3. Chromatin appears granular or clumped
4. Loss of reticular characteristics of benign cells
They MAY have these characteristics:
1. Hyperchromasia of nucleus (hyper-extreme, chroma-colour)
2. Polychromasia of nucleus (poly-multiple)
3. Changes of the shape of nucleus
4. Macronucleoli
5. Abnomal mitosis
6. Multiple nucleus per cell
(7. onwards are cytoplasm)
7. Unusual staining of cytoplasm
8. Formation of syncytical sheets with faded outline (I have no idea what it means)
9. Weird shape of cell
Thank you
Ernest
TG01
0606330i
I have been attached to cytology for 3 weeks.
What is cytology?
Cytology is the study of cells obtain from bodily fluids.
The cytology department receives any fluid from the body such as CSF, aspirates, FNA, smears from urinary tract, reproductive system and so on. They split all the specimens into 2 categories, gynaecological and non-gynaecological. The gynae category means Pap smears (female reproductive tract from vaginal to cervical smears). Non-gynae is everything else.
Pap stands for Papanicolaou stain. It screens to detect premalignant and malignant tissues, mainly from the cervix.
How to take a Pap smear?
I "tooth-brush" like device is used to scrap cells from the opening of the cervix. The medical officer will rotate 360 degrees to gather cells from as large area as possible (to prevent false negative because some areas may not be scrapped). Then they will be smeared onto a slide and stained using the Pap staining method.
Instead of the usual H&E staining, gynae staining is slightly different. They have modified Eosin Azure instead of the normal Eosin, orange G stain and harris haematoxylin. Orange G stains for keratin, and the eosin is special because gynae cells cannot be stained by normal eosin. (I don't know why.)
The test aims to detect cells which are potentially pre-cancerous. The newest classification of degree of malignancy of gynae cells is called Bethesda system.
1. Atypical glandular cells (AGC)
2. Atypical squamous cells of undetermined significance (ASCUS)
3. Low grade squamous intraepithelial lesion (LSIL)
4. High grade squamous intraepithelial lesion (HSIL)
5. Squamous cell carcinoma
It is recommended that females who have had sex undergo regular Pap smear testing, once a year to once in 5 years. If the results are abnormal, they need to do a confirmatory test, about 6months later again (the same test). Other confirmatory test include colposcopy and HPV DNA testing. I am unsure how these are performed.
http://www.medskul.com/gallery/data/519/Faces_of_high_grade_squamous_intraepithelial_lesion_HGSIL_or_HSIL_.jpg
The above picture shows HSIL.
The main things to look out for to confirm malignancy is to observe the nucleus.
They MUST have these characteristics:
1. Enlargement of nucleus
2. Increase in chromatin density
3. Chromatin appears granular or clumped
4. Loss of reticular characteristics of benign cells
They MAY have these characteristics:
1. Hyperchromasia of nucleus (hyper-extreme, chroma-colour)
2. Polychromasia of nucleus (poly-multiple)
3. Changes of the shape of nucleus
4. Macronucleoli
5. Abnomal mitosis
6. Multiple nucleus per cell
(7. onwards are cytoplasm)
7. Unusual staining of cytoplasm
8. Formation of syncytical sheets with faded outline (I have no idea what it means)
9. Weird shape of cell
Thank you
Ernest
TG01
0606330i
Monday, October 6, 2008
Week 15 SIP/MP Experience
Hi all! Its been a long time since we've met, hope u guys are having fun in your respective attachments ^_^ Well this is my experience for this week
For this post I will be touching up on Carbon (energy source), Vitamins and Amino Acids or Other Nitrogen Supplements.
The carbohydrate that is used in the plant media that I am making is sucrose, theoretically, glucose and fructose can be substituted in some cases. Sucrose concentration of cell media is usually 2-3%. Carbohydrates are important in the media as very few plant cell lines can supply their own carbohydrates needs by CO2 assimilation during photosynthesis.
Vitamins are needed when plant cells and tissues are grown in vitro, as some vitamins become limiting factors for growth in vitro. Vitamins required for all cell growth, at concentrations ranging from 0.1 to 10.0 mg/litre. Nicotinic acid and pyroxidic acid are added in 0.1-5.0 mg/litre and 0.1-10.0 mg/litre respectively; both are not essential for cell growth. Myo-inositol is commonly included in many vitamin stock solutions, it is a carbohydrate and not a vitamin, but it has been shown to stimulate cell growth in most species.
Amino acids and other nitrogen supplements are added to further stimulate cell growth as they provide plants cells with an immediately available source of nitrogen. Most commonly used organic nitrogen are L-glutamine, L-asparagine and adenine.
Subscribe to:
Posts (Atom)