Hi everyone, for this week, I am going to post the experiments that will be conducted following culturing of S. maltophilia, which are namely the inoculation and 2nd inculation of S. maltophilia.
After the culturing of S. maltophilia on LB agar, single isolated colonies should be observed on the LB agar after an overnight incubation at 37°C. It should be noted that not all strains of S. maltophilia have simialr growth rate, hence some strains of S. maltophilia may not yield colonies after an overnight incubation. Nevertheless, most strains of S. maltophilia produce colonies after an overnight incubation.
Inoculation of S. maltophilia into LB broth
Principle: To allow the growth and adaptation of S. maltophilia in LB broth at 37°C.
Materials needed:
· 1 sterile 20ml Luria-Bertani (LB) broth (in 50ml tubes)
· Plastic inoculating loops
· S. maltophilia
· NUAIRE Biosafety Cabinet Class II (BSC 2)
· 4°C fridge
· 37°C Orbital shaker incubator (for warming and incubation of LB broth)
· 37°C incubator (for culturing purpose)
· 70% ethanol
· Marker pen
· Scott® C-Fold towels
· Parafilm
· Sticky tapes
· Biohazard bag
· A pair of Sourcelink Powder-Free Latex Medical Examination Gloves (PPE)*
· Clean lab coat (PPE)*
· Covered shoes (PPE)*
*PPE-Personal Protection Equipment
Methods:
1. Incubate the sterile 20ml LB broth into the 37°C Orbital shaker incubator.
2. Swab the work surface of BSC 2 with 70% ethanol.
3. Using an inoculating loop, extract a single isolated colony from the LB agar taken from 37°C incubator.
4. Dip the inoculating loop into the 2oml LB broth and mix it.
5. Discard the inoculating loop into the biohazard bag and label the LB broth.
6. Incubate the LB broth at 37°C in 37°C Orbital shaker incubator overnight while shaking the LB broth with the shaker function of the incubator (Note: The cap of the 50ml centrifuge tube (containing the LB broth and S. maltophilia) must be loosen and tape before placing it into the incubator. This is because S. maltophilia is an obligate aerobe and requires oxygen to grow. By shaking allows air circulation and encourages homogeneous growth of S. maltophilia within the LB broth).
7. Parafilm the LB agar into biohazard bag.
8. Swab the work surface of BSC 2 with 70% ethanol.
Explanation of methods:
Step 1: The LB broth must be warmed up to 37°C so that S. maltophilia does not need to adapt to different temperatures and grow optimally at 37°C. 20ml LB broth is chosen but not any other volume is because it was found that 20ml is the optimal volume for growth of S. maltophilia.
Step 2: This is to ensure the work surface is sterile before any work can proceed. Working inside a BSC 2 is necessary to ensure safety of operator as S. maltophilia is classified as a biosafety class II pathogen. A biosafety class II pathogen is pathogenic and is capable of causing diseases in humans.
Step 3: Self-explanatory
Step 4: Mixing is done is ensure all the S. maltophilia is released into the LB broth and ensure S. maltophilia is evenly distributed in the media.
Step 5: The inoculating loop is considered as biohazardous and should be discarded into biohazard bag (proper disposal). Labeling is done to facilitate identification.
Step 6: This is to allow the growth of S. maltophilia in the LB broth.
Step 7: The LB agar plate (containing the remaining colonies of S. maltophilia) should be parafilmed before disposal. It ensures a safe disposal of bacteria. By sealing the LB agar plate, it prevents oxygen from reaching into the plate and kills all the S. maltophilia.
Step 8: This is to disinfect the work surface.
Result: The LB broth turns cloudy, indicating the growth of S. maltophilia.
2nd inoculation of S. maltophilia into LB broth
Principle: To remove dead cells, debris and toxic metabolic waste products from cells of S.maltophilia and re-inoculate cells into fresh LB broth to prevent overcrowding
Materials needed:
· One 20ml of LB broth (containing S. maltophilia from inoculation)
· Three 20ml of fresh LB broth (for 2nd inoculation, 3 for 1 isolate)
· One 40ml of LB broth (for washing)
· Sterile PBS (phosphate buffered saline) (in 50ml tube)
· 37°C Orbital shaker incubator
· CO8000 Cell density meter
· Centrifuge HERMLE Z 383K machine
· BSC 2
· Centrifuge tube rack
· Disposable pipettes
· Pipettor
· Pipette
· Pipette tips
· 4 cuvettes (1 blank, 3 for each isolate)
· 70% ethanol
· Marker pen
· Scott® C-Fold towels
· Biohazard bag
· Waste bottle
· A pair of Sourcelink Powder-Free Latex Medical Examination Gloves (PPE)*
· Clean lab coat (PPE)*
· Covered shoes (PPE)*
*PPE-Personal Protection Equipment
Methods:
1. Incubate three 20ml LB broth into the 37°C Orbital shaker incubator.
2. Centrifuge the 20ml LB broth (containing the S. maltophilia from inoculation) at 3000xg at 10°C for 20 minutes.
3. Swab the work surface of BSC 2 with 70% ethanol.
4. Decant the supernatant into the waste bottle.
5. Resuspend the cell pellet with 10ml LB broth.
6. Centrifuge at 3000xg at 10°C for 20 minutes.
7. Decant the supernatant into the waste bottle.
8. Resuspend the cell pellet with 10ml LB broth.
9. Centrifuge at 3000xg at 10°C for 20 minutes.
10. Decant the supernatant into the waste bottle.
11. Resuspend the cell pellet with 20ml LB broth.
12. Prepare 4 cuvettes (1 blank and 3 for sample - 1000ul PBS acts as blank and 100ul S. maltophilia + 900ul PBS for each cuvette).
13. Take OD600 readings (3 times and take an average) using CO8000 Cell density meter .
14. Calculate the volume of S. maltophilia required to inoculate into each 20ml LB broth to achieve 5X10^7 cells in each 20ml LB broth.
15. Pipette the calculated volume of S. maltophilia in 20ml LB broth into the each of the 3 fresh 20ml LB broth.
16. Incubate the three 50ml tubes of 20ml LB broth at 37°C in the 37°C Orbital shaker incubator for 16 hours (Note: The cap of the 50ml centrifuge tube (containing the LB broth and S. maltophilia) must be loosen and tape before placing it into the incubator. This is because S. maltophilia is an obligate aerobe and requires oxygen to grow. By shaking allows air circulation and encourages homogeneous growth of S. maltophilia within the LB broth).
17. Discard the remaining LB broth (from inoculation) and wastes into biohazard bag (if full, autoclave the bag).
18. Swab the work surface of BSC 2 with 70% ethanol.
Explanation of methods:
Step 1: The LB broth must be warmed up to 37°C so that S. maltophilia does not need to adapt to different temperatures and grow optimally at 37°C. 20ml LB broth is chosen but not any other volume is because it was found that 20ml is the optimal volume for growth of S. maltophilia.
Step 2: This is to obtain the cell pellet and discard any supernatant (contains dead cells, waste products of cells etc)
Step 3: This is to ensure the work surface is sterile before any work can proceed. Working inside a BSC 2 is necessary to ensure safety of operator as S. maltophilia is classified as a biosafety class II pathogen. A biosafety class II pathogen is pathogenic and is capable of causing diseases in humans.
Step 4: Self-explanatory
Step 5- 10: The cells (S. maltophilia) are washed twice to remove any dead cells, debris and waste products that may affect the growth of S. maltophilia.
Step 11: Since the cells are ultimately inoculated into 20ml LB broth, we should resuspend the cells into similar volume of LB broth before taking of OD600 readings.
Step 12-13: The blank is used for taring of the cell density meter and the cells are diluted 10X before taking OD600 readings.
Step 14: Formula is as follows- (5X10^7)/(Average OD600 reading X 10^10) X 1000
Step 15: The reason for inoculating into three 20ml LB broth is to prevent overcrowding of cells.
Step 16: To allow the growth of S. maltophilia at 37°C .
Step 17: All wastes are considered biohazardous and should be autoclaved.
Step 18: To disinfect the work surface.
Results: The LB broth turns cloudy, indicating the growth of S. maltophilia.
The next experiment will be chloroform shock to extract the periplasmic proteins of S. maltophilia. Please refer to Benjamin's post for more details on chloroform shock.
Alright, till next time...!
Han Yang
TG01
0606190G
Friday, September 26, 2008

Saturday, September 20, 2008
Week 13 - Pre-electrophoresis Preparation for running a gel
Heya guys, long time no see. In a blink of an eye, 13 weeks of SIP/MP have already past. Next week is our 3rd campus discussion and hope to see you all soon. By the way, please refer to Miss Chew's blog for updates regarding whether there is a blog quiz.
Today, I am going to share on one of two methods of pre-electrophoresis preparation steps that are required for my project. The gels that i will be running are 1D-Zymogram, 2D-gel and 2D-Zymogram and the pre-electrophoresis preparation is essential for running the gels mentioned above. To refresh your memory, Zymography is an electrophoresis technique that is used in the detection of protease activity under non-denaturing conditions. It is performed on a zymogram gel, which incorporates the use of a substrate that is copolymerized with polyacrylamide gel . Proteases that catalyze Gelatin , Caesin or Fibrin as a substrate will show up as clearings against a dark blue background after staining with Commassie brilliant blue. (Please read on previous post entry for more information regarding zymogram )
Wthout further ado, the two Pre-electrophoresis preparation steps are Bradford assay and TCA (Trichloroacetic acid) precipitation. In this post, the focus will be on Bradford assay.
Principle of Bradford assay: Bradford assay is a protein colormetric assay that will produces a colour change if proteins are present. The coomassie dye is originally red in colour. However in the presence of protein binding, it changes colour and stabalises into coomassie blue, resulting in an absorbance shift. This happens because of 2 bond to bond interactions taking place. The red form of commassie dye donates free proton to ionized groups on protein disrupting its conformation. This leads to hydrophobic heads of the proteins being exposed. The expose hydrophobic pockets on protein chain bind to non-polar region of the dye by van der waals force. Hence, this positions the positive amine groups closely to negative charge of the dye. Ionic interaction further strengthens the bond and ther is blue coomassie dye. Binding of the protein stabilises blue form of coomassie dye and the complex is measured for protein concentration by absorbance reading at 595nm. If no protein is bound to the dye, the cationic (unbound form) are green or red while binding stabalises the anionic (bound form) are blue in colour.
By using Bradford assay, the periplasmic protein concentration in the supernatant can be determined. The mass of periplasmic proteins remained at a constant at 10ug. By knowing the mass and protein concentration of the protein, the volume of protein sample to be loaded into the wells of the gel can be determined. This is because of the formula: Concentration (ug/ul) = Mass (ug) / Volume (ul). The volume can be found by manipulating the formula: Volume = Mass / Protein concentration (determined by Bradford assay).
Methods and Explanation
1. Warm up Bradford dye reagent to room temperature
It will not affect the sample at cold temperature and works optimally at room temperature
2. Pour Bradford dye reagent to plastic tray and cover with aluminium foil
Bradford reagent is light sensitive and cannot be exposed to light
3. Prepare the centrifuge tubes and mixed in the appopriate standards ( Milli Q + BSA)
Allows a calibration curve to be plotted
4. Prepare the sample in 5X dilutions
This ensures that there will be enough sample left after pipetting, hence need to prepare excess
5. Centrifuge standards and sample (short spin for 7 seconds)
To thoroughly mixed the milli Q and BSA/sample
6. Pipette 5ul of sample or standards in triplicates into each well using reverse pipetting (microtitre plate)
Ensures average readings can be taken after spectrophotometry for accurate results
7. Add 250uL bradford reagent into each well using multichannel pipette and reverse pipetting
Reverse pipetting to ensure exactly 250uL bradford is actually added and not more or less. It also prevents air bubbles forming
Allows binding of bradford to proteins for spectrophotometry
8. Remove air bubbles present using a pipette tip dipped with ethanol
Prevent air bubbles in samples, lead to inaccurate results
9. Cover microtitre plate with aluminium foil and incubate 30 minutes
Allow the reaction to occur at room temperature
10. Set up the spectrophotometer
To measure absorbance reading at 595 nm and to quantitate amount of proteins
The need to use BSA Standards: BSA standards are prepared at the concentration of 0, 0.1, 0.25, 0.5, 0.75mg/ml to obtain a linear range (standard curve). When the commassie blue dye binds to the protein, absorbance reading is read using spectrophotometer and absorbance reading is interpolated to the linear range of Bradford Assay. The protein concentration can thus be obtained.
That's all for now. Thanks you for reading my post and have an enjoyable next 7 weeks!
From: Benjamin Ma
Class: TG01
0606181F
Today, I am going to share on one of two methods of pre-electrophoresis preparation steps that are required for my project. The gels that i will be running are 1D-Zymogram, 2D-gel and 2D-Zymogram and the pre-electrophoresis preparation is essential for running the gels mentioned above. To refresh your memory, Zymography is an electrophoresis technique that is used in the detection of protease activity under non-denaturing conditions. It is performed on a zymogram gel, which incorporates the use of a substrate that is copolymerized with polyacrylamide gel . Proteases that catalyze Gelatin , Caesin or Fibrin as a substrate will show up as clearings against a dark blue background after staining with Commassie brilliant blue. (Please read on previous post entry for more information regarding zymogram )
Wthout further ado, the two Pre-electrophoresis preparation steps are Bradford assay and TCA (Trichloroacetic acid) precipitation. In this post, the focus will be on Bradford assay.
Principle of Bradford assay: Bradford assay is a protein colormetric assay that will produces a colour change if proteins are present. The coomassie dye is originally red in colour. However in the presence of protein binding, it changes colour and stabalises into coomassie blue, resulting in an absorbance shift. This happens because of 2 bond to bond interactions taking place. The red form of commassie dye donates free proton to ionized groups on protein disrupting its conformation. This leads to hydrophobic heads of the proteins being exposed. The expose hydrophobic pockets on protein chain bind to non-polar region of the dye by van der waals force. Hence, this positions the positive amine groups closely to negative charge of the dye. Ionic interaction further strengthens the bond and ther is blue coomassie dye. Binding of the protein stabilises blue form of coomassie dye and the complex is measured for protein concentration by absorbance reading at 595nm. If no protein is bound to the dye, the cationic (unbound form) are green or red while binding stabalises the anionic (bound form) are blue in colour.
By using Bradford assay, the periplasmic protein concentration in the supernatant can be determined. The mass of periplasmic proteins remained at a constant at 10ug. By knowing the mass and protein concentration of the protein, the volume of protein sample to be loaded into the wells of the gel can be determined. This is because of the formula: Concentration (ug/ul) = Mass (ug) / Volume (ul). The volume can be found by manipulating the formula: Volume = Mass / Protein concentration (determined by Bradford assay).
Methods and Explanation
1. Warm up Bradford dye reagent to room temperature
It will not affect the sample at cold temperature and works optimally at room temperature
2. Pour Bradford dye reagent to plastic tray and cover with aluminium foil
Bradford reagent is light sensitive and cannot be exposed to light
3. Prepare the centrifuge tubes and mixed in the appopriate standards ( Milli Q + BSA)
Allows a calibration curve to be plotted
4. Prepare the sample in 5X dilutions
This ensures that there will be enough sample left after pipetting, hence need to prepare excess
5. Centrifuge standards and sample (short spin for 7 seconds)
To thoroughly mixed the milli Q and BSA/sample
6. Pipette 5ul of sample or standards in triplicates into each well using reverse pipetting (microtitre plate)
Ensures average readings can be taken after spectrophotometry for accurate results
7. Add 250uL bradford reagent into each well using multichannel pipette and reverse pipetting
Reverse pipetting to ensure exactly 250uL bradford is actually added and not more or less. It also prevents air bubbles forming
Allows binding of bradford to proteins for spectrophotometry
8. Remove air bubbles present using a pipette tip dipped with ethanol
Prevent air bubbles in samples, lead to inaccurate results
9. Cover microtitre plate with aluminium foil and incubate 30 minutes
Allow the reaction to occur at room temperature
10. Set up the spectrophotometer
To measure absorbance reading at 595 nm and to quantitate amount of proteins
The need to use BSA Standards: BSA standards are prepared at the concentration of 0, 0.1, 0.25, 0.5, 0.75mg/ml to obtain a linear range (standard curve). When the commassie blue dye binds to the protein, absorbance reading is read using spectrophotometer and absorbance reading is interpolated to the linear range of Bradford Assay. The protein concentration can thus be obtained.
That's all for now. Thanks you for reading my post and have an enjoyable next 7 weeks!
From: Benjamin Ma
Class: TG01
0606181F
Sunday, September 14, 2008
Week 12
This month I will be introducing to you guys about a new method that I learnt in the microbiology department how to detect the presence of occult blood in stools specimens.
My company uses a kit called Hema-Screen. It is a guaiac slide test for the qualitative detection of fecal occult blood. It is a useful aid in diagnosis of a number of gastrointestinal disorders.
The detection of occult blood is critical to many gastrointestinal diseases. The presence of occult blood in fecal material may indicate gastrointestinal pathology such as hemorrhoids, diverticulitis, fissures, colitis or colorectal cancer. Hence Hema-Screen is a simple, aesthetic, inexpensive test designed for the use in collection and preparation of stool specimens. It overcomes the instability of guaiac solution and the hypersensitivity of benezidine and ortho-tolidine.
The principle of the test is as follows. Hema-screen is composed of guaiac impregnated paper enclosed in a cardboard frame, which permits sample application to one side, and development and interpretation on the reverse side. The process involves placing 2 specimens onto the guaiac paper.
Hema screen, like all guaiac paper test for occult blood, is based on the oxidation of phenolic compounds present in the guaiac to quinines resulting in production of the blue color. Because of its similarity to the prosthetic group of peroxidase, the hematin portion of the hemoglobin molecule can function in a pseudoenzymatic manner, catalyzing the oxidation of guaiac. So when a fecal specimen containing occult blood is applied on the test paper, contact is made between hemoglobin and the guaiac. A pseudoperoxidase reaction will occur upon addition of the developer solution, with a blue chromagen formed proportionally to thee concentration of hemoglobins. The color reaction will occur after 30 seconds.
If a positive result is obtained with the test, a follow-up with additional diagnostic tests, as soon as possible, is essential. As with any occult blood test, results with Hema-Screen cannot be consider conclusive evidence of the presence or absence of gastrointestinal bleeding or pathology. The test is not intended as a replacement for other diagnostic procedures such as proctosigmoidoscopy examination, barium enema, and X-ray studies.
Ivan Ng
TG01
0605070B
My company uses a kit called Hema-Screen. It is a guaiac slide test for the qualitative detection of fecal occult blood. It is a useful aid in diagnosis of a number of gastrointestinal disorders.
The detection of occult blood is critical to many gastrointestinal diseases. The presence of occult blood in fecal material may indicate gastrointestinal pathology such as hemorrhoids, diverticulitis, fissures, colitis or colorectal cancer. Hence Hema-Screen is a simple, aesthetic, inexpensive test designed for the use in collection and preparation of stool specimens. It overcomes the instability of guaiac solution and the hypersensitivity of benezidine and ortho-tolidine.
The principle of the test is as follows. Hema-screen is composed of guaiac impregnated paper enclosed in a cardboard frame, which permits sample application to one side, and development and interpretation on the reverse side. The process involves placing 2 specimens onto the guaiac paper.
Hema screen, like all guaiac paper test for occult blood, is based on the oxidation of phenolic compounds present in the guaiac to quinines resulting in production of the blue color. Because of its similarity to the prosthetic group of peroxidase, the hematin portion of the hemoglobin molecule can function in a pseudoenzymatic manner, catalyzing the oxidation of guaiac. So when a fecal specimen containing occult blood is applied on the test paper, contact is made between hemoglobin and the guaiac. A pseudoperoxidase reaction will occur upon addition of the developer solution, with a blue chromagen formed proportionally to thee concentration of hemoglobins. The color reaction will occur after 30 seconds.
If a positive result is obtained with the test, a follow-up with additional diagnostic tests, as soon as possible, is essential. As with any occult blood test, results with Hema-Screen cannot be consider conclusive evidence of the presence or absence of gastrointestinal bleeding or pathology. The test is not intended as a replacement for other diagnostic procedures such as proctosigmoidoscopy examination, barium enema, and X-ray studies.
Ivan Ng
TG01
0605070B
Saturday, September 6, 2008
Week 11
Hi
I will be sharing about shaving, embedding and alittle on special stains. (Because I've only started on special stains two days ago)
----------------------------------------------------------------------------------
Shaving of blocks, also known as trimming of blocks.
In the histopathology department, most blocks are trimmed before they are sectioned. The purpose is to allow the tissue to be fully exposed before sectioning. It is required that as much area is exposed, to allow the pathologist to read a greater area of tissue.
The greater the area, the higher chances that the pathologist will read it correctly. ie lesser false negatives.
Occassionally, there will be staple bullets and sutures in the blocks. (Sutures are sugical threads) Where do they come from? When the surgeons operated on the patients, they staple the organs/tissues or tie sutures around them to allow orientation. Thus, when pathologist cut these tissues, they may also put these sutures and staple bullets into the cassettes and sent for processing. Sutures and staple bullets do not interfere in tissue processing but they will damage the microtome blade. It MAY damage the tissue processor IF the tissue processor uses microwave technology. If a metallic object is placed in a microwave, a "mini-thunderstrom" will occur in the microwave.
Microwaves electrically charge the air between a metallic object and the metal contained in the oven walls. This ionized air produces an electric current like a small lightning bolt.
Shaving is done using a blunt reused blade (to save money) and is cut at 20um at each swipe of the blade. However, there is a speed up button. When you hold down the button, it is cut at 50um or double the cutting distance. This would help the user speed up shaving. However, we must be cautious when holding this button because when we encounter small tissue, we may over-cut it and the whole tissue gets cut-away.
After the blocks are trimmed, they are softened using a strong detergent. Why? Because some tissues are hard like fibroids. It would be difficult to section. What about bones? They are the hardest thing in the human body. A strong detergent would not be able to soften them. In this case, we use a decalcifying agent to remove calcium from bones. Calcium crystals is what makes the bones hard. A mild acid is enough to decalcify bones.
Softening is done in 5minutes and decalcification is done for a few hours.
----------------------------------------------------------------------------------
In embedding, the basket of tissues are removed from the tissue processor and placed on the heated surface of the embedding machine. Next, we would account for all the cassettes, we must ensure that all the cassettes are present. This is done by checking with the checklist, which is written before the cassettes are placed in the processor. Once the number of cassettes are checked, we would next need to count the number of tissues in the cassette, which corresponds to the number written on the cassettes. For example, if the cassette is written x3 or x6, there must be 3 and 6 tissues present respectively. If there are not, we must report it immediately as the tissues may have dropped out during processing. If this is left unreported, we would be held responsible for any missing tissues.
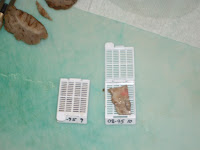
Picture taken from http://pathology.utscavma.org/wp-content/uploads/2008/03/path-club-pics-024.JPG
Then, we select the most appropriate size mould.
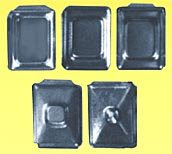
Picture taken from http://www.tedpella.com/embed_html/27185.jpg
If we select a mould that is too big, we would be wasting wax. If the mould is too small, there wouldn't be enough "grip" onto the slides. Wax is needed to grip onto the slides during sectioning.
First, pour alittle moulten wax into the mould, then place the tissue onto the mould. Gently press the tissue down so that it is flat. (Shaving would be easier if we press down the tissue. Remember what I said? We must expose as much area as possible) Then, we place the empty cassette over the mould, without the cassette cover. Pour alittle more wax and voila! Let the block cool down on the cold plate. After 5 mins or so, we can pluck out the block from the mould.
----------------------------------------------------------------------------------
I will touch alittle on special stains.
Namely, the difference between PAS and PASD. This is the only manual stain I have done so far.
PAS stands for Periodic acid-Schiff. It stains glycogen in tissues. How? The periodic acid reacts by oxidizing the glucose residues and creates aldehydes that reacts with the schiff reagent. This creates a magenta colour (purple). A counter stain will then be used, usually a basic dye. In my lab, we use haematoxylin, to stain the nucleus.
The D in PASD stands for diastase. It is an enzyme which breaks down glycogen. In the past, lab technicians can use their sailva because saliva contains amylase. However, our saliva contains many impurities, thus it is not ideal. The commercial diastase is recommended. Since PAS stains glycogen and diastase breaks down glycogen, PASD is the negative control. A light pink colour would be present instead of the magenta. Often, PAS and PASD are performed together on the same slide but different tissues. Differences in the intensities of the 2 stains can roughly quantify the glycogen concentration. Ulitmately, PASD is to ellucidate gastic duodenal metaplasia, commonly found in dudenal adenomas.
----------------------------------------------------------------------------------
Thank you
Ernest
TG01
0606330i
I will be sharing about shaving, embedding and alittle on special stains. (Because I've only started on special stains two days ago)
----------------------------------------------------------------------------------
Shaving of blocks, also known as trimming of blocks.
In the histopathology department, most blocks are trimmed before they are sectioned. The purpose is to allow the tissue to be fully exposed before sectioning. It is required that as much area is exposed, to allow the pathologist to read a greater area of tissue.
The greater the area, the higher chances that the pathologist will read it correctly. ie lesser false negatives.
Occassionally, there will be staple bullets and sutures in the blocks. (Sutures are sugical threads) Where do they come from? When the surgeons operated on the patients, they staple the organs/tissues or tie sutures around them to allow orientation. Thus, when pathologist cut these tissues, they may also put these sutures and staple bullets into the cassettes and sent for processing. Sutures and staple bullets do not interfere in tissue processing but they will damage the microtome blade. It MAY damage the tissue processor IF the tissue processor uses microwave technology. If a metallic object is placed in a microwave, a "mini-thunderstrom" will occur in the microwave.
Microwaves electrically charge the air between a metallic object and the metal contained in the oven walls. This ionized air produces an electric current like a small lightning bolt.
Shaving is done using a blunt reused blade (to save money) and is cut at 20um at each swipe of the blade. However, there is a speed up button. When you hold down the button, it is cut at 50um or double the cutting distance. This would help the user speed up shaving. However, we must be cautious when holding this button because when we encounter small tissue, we may over-cut it and the whole tissue gets cut-away.
After the blocks are trimmed, they are softened using a strong detergent. Why? Because some tissues are hard like fibroids. It would be difficult to section. What about bones? They are the hardest thing in the human body. A strong detergent would not be able to soften them. In this case, we use a decalcifying agent to remove calcium from bones. Calcium crystals is what makes the bones hard. A mild acid is enough to decalcify bones.
Softening is done in 5minutes and decalcification is done for a few hours.
----------------------------------------------------------------------------------
In embedding, the basket of tissues are removed from the tissue processor and placed on the heated surface of the embedding machine. Next, we would account for all the cassettes, we must ensure that all the cassettes are present. This is done by checking with the checklist, which is written before the cassettes are placed in the processor. Once the number of cassettes are checked, we would next need to count the number of tissues in the cassette, which corresponds to the number written on the cassettes. For example, if the cassette is written x3 or x6, there must be 3 and 6 tissues present respectively. If there are not, we must report it immediately as the tissues may have dropped out during processing. If this is left unreported, we would be held responsible for any missing tissues.

Picture taken from http://pathology.utscavma.org/wp-content/uploads/2008/03/path-club-pics-024.JPG

Then, we select the most appropriate size mould.

Picture taken from http://www.tedpella.com/embed_html/27185.jpg

If we select a mould that is too big, we would be wasting wax. If the mould is too small, there wouldn't be enough "grip" onto the slides. Wax is needed to grip onto the slides during sectioning.
First, pour alittle moulten wax into the mould, then place the tissue onto the mould. Gently press the tissue down so that it is flat. (Shaving would be easier if we press down the tissue. Remember what I said? We must expose as much area as possible) Then, we place the empty cassette over the mould, without the cassette cover. Pour alittle more wax and voila! Let the block cool down on the cold plate. After 5 mins or so, we can pluck out the block from the mould.
----------------------------------------------------------------------------------
I will touch alittle on special stains.
Namely, the difference between PAS and PASD. This is the only manual stain I have done so far.
PAS stands for Periodic acid-Schiff. It stains glycogen in tissues. How? The periodic acid reacts by oxidizing the glucose residues and creates aldehydes that reacts with the schiff reagent. This creates a magenta colour (purple). A counter stain will then be used, usually a basic dye. In my lab, we use haematoxylin, to stain the nucleus.
The D in PASD stands for diastase. It is an enzyme which breaks down glycogen. In the past, lab technicians can use their sailva because saliva contains amylase. However, our saliva contains many impurities, thus it is not ideal. The commercial diastase is recommended. Since PAS stains glycogen and diastase breaks down glycogen, PASD is the negative control. A light pink colour would be present instead of the magenta. Often, PAS and PASD are performed together on the same slide but different tissues. Differences in the intensities of the 2 stains can roughly quantify the glycogen concentration. Ulitmately, PASD is to ellucidate gastic duodenal metaplasia, commonly found in dudenal adenomas.
----------------------------------------------------------------------------------
Thank you
Ernest
TG01
0606330i
Sunday, August 31, 2008
Week 10 SIP/MP


Pictures for the vitro vents requested.
Hello all, after reading the comments in my last post, I have decided to explain the different components of the media and I hope that everyone will understand better why the different components must be added.
MEDIA
Media components
The composition of the plant media is important for the plant media to grow properly. Plant tissue is usually made up of the following components: macronutrients, micronutrient, vitamins, amino acid or other nitrogen supplements, sugar(s), other undefined organic supplements, solidifying agents or support systems and growth regulators. For this post, I will be touching on macronutrients, micronutrients.
The media formulation that is used- Murashige and Skoog formulation contains the macronutrients and micronutrients. Macronutrients provide 6 major elements needed for plant growth: Nitrogen, Phosphorous, Potassium, Calcium, Magnesium and Sulfur. 25-60 mM of inoraganic nitrogen is needed in a culture for adequate plant growth. Potassium is needed for cell growth of plant species, most media have potassium in the nitrate, sulfate or choride form at concentration of 20-30 mM. The rest of the elements: Phosphorous, Magnesium, Sulfur and Calcium are included at concentrations ranging from 1-3 mM. Higher concentrations of these nutrients may be needed if dificiency of other nutrients are present. Micronutrients are elements such as Iron, Manganese, Zinc, Boron, Copper and Molybdenum. Chelated form of iron and zinc are commonly used, with Iron being very important. Iron citrate maybe used in culture media but the compounds are had to dissolve and usually precipitate out after media is done. Murashige and Skoog uses ethylene diaminetetraacetic acid-iron chelate to overcome this problem. Sodium and Chlorine are also used in some medium but are not essential for growth. Iron and Molybdenum are added at concentrations of 1 microM, Zinc at 5-30 microM, Manganese at 20-90 microM, Boron at 25-100 microM and Copper at 0.1 microM
Sunday, August 24, 2008
Week 9 MP - Culturing of Stenotrophomonas maltophilia
Hi everyone...! I have changed my MP due to some unforseen circumstances (which I shall not elaborate further) and it will be somehow similar to Benjamin's MP.
MP title: Development of 2D-Zymogram protocols to detect and identify Stenotrophomonas maltophilia periplasmic proteases and compare their activity at 37°C vs 28°C.
Quick facts on Stenotrophomonas maltophilia (S.maltophilia)
MP title: Development of 2D-Zymogram protocols to detect and identify Stenotrophomonas maltophilia periplasmic proteases and compare their activity at 37°C vs 28°C.
Quick facts on Stenotrophomonas maltophilia (S.maltophilia)
- Previously known as Pseudomonas maltophilia or Xanthomonas maltophilia
- Sole member of the genus, Stenotrophomonas
- Gram-negative bacillus (rod-shaped) which is gram-stained pink
- Aerobic (require oxygen to grow and survive)
- Non-fermentative
- Motile by means of flagella
- Found widely in environment and hospitals
- Infects immunocompromised individuals especially
Why study S.maltophilia ?
- Important nosocomial pathogen
- Highly antibiotics resistant
- Little is known of its virulence factors, genetic structure and pathogenicity
- Ageing population
- Increased use of surgical equipments
Culturing of S.maltophilia
Principle: To allow the growth of S.maltophilia on LB agar plate and to obtain single, isolated colonies of the bacterium.
Materials
- S.maltophilia isolates (in vials, frozen state)
- Disposable inoculating loops
- LB agar
- 37°C incubator
- Biosafety cabinet 2 (BSC 2)
- 70% ethanol
- Marker pen
- Biohazard bag
- Appropriate personal protection equipments (e.g. Lab coat, covered shoes and gloves)
Methods
- Set up BSC 2.
- Dry LB agar in 37°C incubator.
- Swab vials (containing S.maltophilia isolates), inoculating loops and LB agar with 70% ethanol.
- Place the necessary materials into the BSC 2 and arrange them orderly.
- Label the LB agar plate.
- Streak on the LB agar plate with an inoculating loop (with S.maltophilia).
- Dispose used inoculating loops into biohazard bag.
- Swab the LB agar plate with 70% ethanol before incubating at 37°C overnight.
- Observe for single, isolated colonies.
Explanation of methods
1) To provide a sterile environment for culturing to prevent any contamination. To protect the user from S.maltophilia (safety reason).
2) To prevent the formation of water droplets from condensation as the LB agar are stored in the fridge.
3) Aseptic techniques
4) To facilitate workflow within the BSC 2.
5) To facilitate identification of S.maltophilia isolate.
6) To transfer S.maltophilia onto the LB agar plate.
7) Used inoculating loops are considered biohazard wastes and should be disposed in biohazard bag and autoclave later.
8) To disinfect the outer surface of LB agar plate with 70% ethanol before incubation. Incubation at 37°C overnight allows growth of S.maltophilia optimally.
9) This shows that streaking was done properly (recall streaking techniques from Basic Microbiology) and the colonies will be used for subsequent experiment such as inoculation.
That's all for this week!
Tan Han Yang
0606190G
TG01
Saturday, August 16, 2008
Week 8 SIP - Chloroform Shock
Hello everyone. It is the 8th week of SIP/MP and its my turn to blog again. This week I will blog on Chloroform Shock its relevance to my project.
Chloroform Shock is a method which is commonly used in the extraction of periplasmic proteins of gram-negative bacteria. Gram-negative bacteria is not only enclosed by its cell membrane, but also a periplasm. Many periplasmic proteins can be found within the periplasmic space (the region between the inner and outer membrane) of the bacteria. Hence, to extract these periplasmic proteins, chloroform is used.
Chloroform is a solvent which is relatively unreactive, miscible and volatile. It has to be said the exact mechanism of action of chloroform shock is currently not known. However, scientiests have been using this technique to extract periplasmic proteins. It is postulated that chloroform form pores in the outer cell wall of the gram-negative bacteria and releasing periplasmic proteins out into the extracellular environment. The optimal time for chloroform to work is 15 minutes for extract of periplasmic proteins only. If the time taken is too short, it may not have reached/penetrate the periplasmic space and periplasmic proteins are not extracted. When the time taken is too long, it may penetrate the periplasmic space and will extract other intracellular proteins as well, such as cell membrane proteins which is irrelevant to my project. Thus, great care must be taken to ensure reaction of the bacteria (cell pellet) with chloroform is 15 minutes exactly.
The use of chloroform is not without its risks. The bottle of chloroform is always opened within the Biosafety Level II Cabinet (which i am using) and not outside it. This is because accidental inhalation can be bad for the health. The role of the Biosafety Cabinet level II is to protect the user as well as the speciman. In Class II cabinets, there is always stream of inward air moving into the cabinet. This is called the inflow and prevents the aerosol generated during any microbial work, to escape out of the Cabinet (air can only flow into the BSC but not out). The inflow can only reach the front inlet grill, just in front of the operator. This is to ensure that unfiltered air outside the BSC cannot enter the BSC and thus there will not be any contamination. A special feature of BSC Level II cabinet is the HEPA-filtered air stream which causes air stream to flow downwards inside the BSC after sucking air from above and filtered. This flushing is called downflow and protects samples within BSC from contamination. In the case where chloroform is accidentally inhaled or consumed, it can depress the nervous system and cause dizziness, fatigue and headache. Hence the appropriate personal protective equipment to wear is a pair of gloves, labcoat and work inside the Biosafety Level II cabinet when performing chloroform shock.
Basic Outline of Chloroform Shock (sorry i cannot give the full details such as centrifuge speed, volume, etc as my supervisor do not allow, hence here is only the basic workflow)
1. Centrifuge to obtain cell pellet (from broth culture)
2. Wash cell pellet
3. Resuspend with PBS (phosphate buffer saline)
4. Repeat step 1 and 2 three times
5. Take OD600 reading
6. Calculate volume of cells to dispense into 5 eppendorf tubes
7. Centrifuge the 5 eppendorf tube
8. Decant supernatant and mix gently
9. Add chloroform and incubate 15 minutes
10. Add Tris-HCl
11. Centrifuge the eppendorf tubes
12. Extract the periplasmic proteins from the supernatant
Thanks for taking your time to read my entry and have an enjoyable and fruitful SIP for the next 12 weeks.
From: Ma Xianwei Benjamin
Class: TG01
0606181F
Chloroform Shock is a method which is commonly used in the extraction of periplasmic proteins of gram-negative bacteria. Gram-negative bacteria is not only enclosed by its cell membrane, but also a periplasm. Many periplasmic proteins can be found within the periplasmic space (the region between the inner and outer membrane) of the bacteria. Hence, to extract these periplasmic proteins, chloroform is used.
Chloroform is a solvent which is relatively unreactive, miscible and volatile. It has to be said the exact mechanism of action of chloroform shock is currently not known. However, scientiests have been using this technique to extract periplasmic proteins. It is postulated that chloroform form pores in the outer cell wall of the gram-negative bacteria and releasing periplasmic proteins out into the extracellular environment. The optimal time for chloroform to work is 15 minutes for extract of periplasmic proteins only. If the time taken is too short, it may not have reached/penetrate the periplasmic space and periplasmic proteins are not extracted. When the time taken is too long, it may penetrate the periplasmic space and will extract other intracellular proteins as well, such as cell membrane proteins which is irrelevant to my project. Thus, great care must be taken to ensure reaction of the bacteria (cell pellet) with chloroform is 15 minutes exactly.
The use of chloroform is not without its risks. The bottle of chloroform is always opened within the Biosafety Level II Cabinet (which i am using) and not outside it. This is because accidental inhalation can be bad for the health. The role of the Biosafety Cabinet level II is to protect the user as well as the speciman. In Class II cabinets, there is always stream of inward air moving into the cabinet. This is called the inflow and prevents the aerosol generated during any microbial work, to escape out of the Cabinet (air can only flow into the BSC but not out). The inflow can only reach the front inlet grill, just in front of the operator. This is to ensure that unfiltered air outside the BSC cannot enter the BSC and thus there will not be any contamination. A special feature of BSC Level II cabinet is the HEPA-filtered air stream which causes air stream to flow downwards inside the BSC after sucking air from above and filtered. This flushing is called downflow and protects samples within BSC from contamination. In the case where chloroform is accidentally inhaled or consumed, it can depress the nervous system and cause dizziness, fatigue and headache. Hence the appropriate personal protective equipment to wear is a pair of gloves, labcoat and work inside the Biosafety Level II cabinet when performing chloroform shock.
Basic Outline of Chloroform Shock (sorry i cannot give the full details such as centrifuge speed, volume, etc as my supervisor do not allow, hence here is only the basic workflow)
1. Centrifuge to obtain cell pellet (from broth culture)
2. Wash cell pellet
3. Resuspend with PBS (phosphate buffer saline)
4. Repeat step 1 and 2 three times
5. Take OD600 reading
6. Calculate volume of cells to dispense into 5 eppendorf tubes
7. Centrifuge the 5 eppendorf tube
8. Decant supernatant and mix gently
9. Add chloroform and incubate 15 minutes
10. Add Tris-HCl
11. Centrifuge the eppendorf tubes
12. Extract the periplasmic proteins from the supernatant
Thanks for taking your time to read my entry and have an enjoyable and fruitful SIP for the next 12 weeks.
From: Ma Xianwei Benjamin
Class: TG01
0606181F
Subscribe to:
Posts (Atom)