
Tuesday, December 16, 2008
Sunday, November 9, 2008
Week 20 SIP
Hi all this is the last week of SIp, well actually its already over. Hope you all enjoyed you SIP and well its time for reports to be handed up and for school to resume.For this round I will be touching on undefined organic elements solidfying agents
Undefined organic elements include protein hydrolysates, coconut water, yeast extracts, activated charcoal, malt extracts, ground banana, orange juice and tomato juice. The addition of activated charcoal to culture media may have a beneficial effect. It can stimulate cell growth by its ability to bind to toxic phenolic compounds produced during culture. Activated charcoal is usually added to the media, acid wash prior to addition at concentration of 0.5% to 3.0%.
Agar is the most commonly used geling agent for preparing semisolid and solid plant tissue culture media. Advantages of agar: it forms a gel when mixed with water that melts at approximately 60-100 degrees celcius and solidifies at approximately 45 degrees celcius. It also does not react with media constituents and will not be digested by plant enzymes. The firmness of the agar gel is controlled by the concentration nad brand of agar used. Typical concentration used is 0.5% to 1%; the concentration give a firm gel at the pH lvels typical of plant culture media.
Another geling agent would be gelrite, it is a product of bacteria fermentation and should be used at 1.25-2.5 g/L, resulting in a clear gel which aids in detecting contamination.
Johan
TG02
0606637G
Monday, November 3, 2008
Week 19- 2D-SDS-PAGE & 2D-Zymography
Hello guys...One more week to go before the end of SIP/MP. In my final post, I shall mention on the last phase of my project, which is the running of 2D-gel electrophoresis. The 2D-gel electrophoresis will be divided into the 2D-SDS-PAGE and 2D-Zymography. For those who are still wondering what zymography is, please refer to Benjamin's entry for more information. Before I continue, let me define these two gel electrophoresis techniques.
2D-SDS-PAGE: It is an electrophoretic technique which uses a SDS-polyacrylamide gel to separate proteins based on molecular weight only (function of SDS molecules).
2D-Zymography: It is an electrophoretic technique which makes use of the same principle of how 2D-SDS-PAGE works and uses a SDS-polyacrylamide gel co-polymerized (in simpler term: combined) with a protein substrate, gelatin. The addition of gelatin into the gel is to detect protease activity, which is our main interest.
Following extraction of periplasmic proteins by chloroform shock (recall from my previous post), we shall screen for the isolate of S. maltophilia where its periplasmic proteases exhibit the highest protease activity. This can be achieved by running the 1D-zymography which is thoroughly elaborated by Benjamin's post. On the 1D-zymogram gel, protease activity will be visualized as clear bands (transparent bands). The S. maltophilia isolate(s) which has the most number and largest clearings will most likely be our isolate of interest and we will culture this isolate for the 2D-SDS-PAGE and 2D-zymography.
The reason why we are detecting these periplasmic protease activities is because these proteases might be potential virulence factors of S. maltophilia which cause diseases in humans. Hence, it is of great significance that we identify these periplasmic proteases and hopefully in the years to come, new vaccines can be created to target against these virulence factors.
The difference between 1D-zymography and 2D-zymography is that in 1D-zymography, proteins are separated based on molecular weight only. However in 2D-zymography, proteins are separated based on 2 dimensions, where the first dimension separation is isoelectric focusing (IEF), where proteins are separated based on their isoelectric points. The second dimension separation is SDS-PAGE, where proteins are separated based on their molecular weights. On the 1D-zymogram gel, proteins will appear as bands. On the other hand on the 2D-zymogram gel, proteins will appear as spots. Periplasmic protease activity will be visualized as clear (transparent) bands on the 1D-zymogram gel as compared to the 2D-zymogram gel where periplasmic protease activity will be visualized as clear spots. Logically speaking, proteins undergoing 2 dimensional separations will be more resolved as comapred to 1 dimensional separation.
In summary...
1D-zymography: 1st dimensional separation- SDS-PAGE
Proteins are separated based on their molecular weights (MW).
2D-zymography: 1st dimensional separation- Isoelectric focusing (IEF)
Proteins are separated based on their isoelectric points (pIs).
2nd dimensional separation- SDS-PAGE
Proteins are separated based on their molecular weights (MW).
In 2D-gel electrophoresis for our research application, it is necessary to run the 2D-SDS-PAGE and 2D-zymography together on the same time. This is because we would want to detect the region of periplasmic protease activity on the 2D-zymogram gel and match that region to that on the 2D-SDS-polyacrylamide gel. If there is protein spots on the 2D-SDS-polyacrylamide gel corresponding to the location of the clearings on the 2D-zymogram gel, it will most likely imply that those protein spots are the periplasmic proteases accounting for the clearings on the 2D-zymogram gel.
Ultimately, the main highlight of our project is to obtain the identity of the periplasmic proteases. However before this can occur, we must first develop and optimize our 2D-zymography protocol, which is the gist of our project and it is still ongoing. Wish us luck and all the best for the last lap of SIP/MP...!!! :)
Name: Tan Han Yang
Class: TG01
Admin no. : 0606190G
Saturday, October 25, 2008
Running 1 1D-Zymogram - Week 18
Hi people, time really flies. This is already week 18 and there are 2 weeks left before the end of SIP/MP. This week, i will share with you what is a 1D-Zymogram and how to run it based on the protocol that my partner and I have developed.
Principle of Zymography: Zymography is an electrophoresis technique that is used in the detection of protease activity under non-denaturing conditions. It is performed on a zymogram gel, which incorporates the use of a substrate that is copolymerized with polyacrylamide gel. Proteases that catalyze Gelatin , Caesin or Fibrin as a substrate will show up as clearings against a dark blue background after staining with Coomassie brilliant blue.
The use of zymography encompasses the use of many different buffer systems. Sample buffer is used in conjunction with the protein sample for a few purposes. Sample buffer helps to control pH, controls sample/ion movement, increase sample viscosity and density (aid in loading into sample wells), provide tracking dye (monitor seperation during electrophoresis), provide denaturing molecules (SDS to linearise proteins) and provide chemical reducing agents (control sample chemistries). Another buffer system is the running buffer system. Sample wells are filled with running buffer which contains ions that helps in the constant migration of proteins towards the bottom of the well, when voltage/current is applied. The 3rd buffer system that is used is the renaturation buffer system which helps to renature (allows protein to fold back) to their tertiary structure in order for it to exhibit enzymatic activity on the gelatin substrate of the zymogram gel. Proteins in its linearised state do not exhibit enzyamtic activity (linearised by SDS) and requires renautration using renaturation buffer to restore its enzymatic activity. The fourth buffer system that is used is the developing buffer system which is used to develop the zymogram gel after addition of renaturation buffer. Developing buffer allows protease to exhibit enzymatic activity on the zymogram gel (digest gelatin).
The gel is stained with Coomassie Brilliant Blue stain (Biosafe Biorad) to visualise the protease activity, which will stain the whole zymogram gel blue in colour. The zymogram gel is then destained with MilliQ water to remove excess commassie blue and proteins that exhbit enzymatic activity will produce clearings against a dark blue background. Coomassie Brilliant Blue stain has high affinity to proteins present on the 10% gelatin zymogram gel. Gelatin is considered a protein substrate as well as the periplasmic proteins that is present on the zymogram gel after seperation by electrophoresis. Coomassie Brilliant Blue stain binds tightly to both of these proteins, hence, the gel appears blue in colour. Periplasmic proteins which exhibits protease enzymatic activity on the gel, will digest the gelatin substrates. Hence the region of the zymogram which is digested lacks proteins. Without proteins, Coomassie Brilliant Blue stain will have poor affinity with the gel and can easily be destained/washed off in the presence of destaining solution/DI water.
1D-Zymography is an electrophoresis technique that seperates proteins 1 dimensionally based on molecular weight on the zymogram gel. Proteins are linearised with SDS and carry an overall negative net charge. Larger proteins have more SDS bound to it and smaller proteins have less SDS bound to it. This ensure that proteins have a constant mass to charge ratio of 1.4g SDS/protein. When an electric current is applied, proteins will migrate towards the anode (+) of the gel. Larger molecular weight proteins will migrate slower and appear at the bottom of the gel. Smaller molecular weight proteins migrate faster and appear in higher regions of gel. Proteins that exhibit enzymatic activity on the gelatin substrate, will appear as clearings against a dark blue blackground after destaining in the destaining solution.
Methods
Sample Preparation
1. Add/pipette in 10 ul of SDS-Sample buffer into each of the 11 eppendorf tubes ( 11 tues for 11 isolated)
Reason: Equal volume of sample buffer added to equal volume of sample is important, as it allows equal amount of SDS to bind to equal amount of proteins to have a constant mass to charge ratio of 1.4g SDS/ protein.
2. Add/Pipette in 10ul of Sample + DI water (periplasmic proteins) into each of the 11 eppendorf tubes
Reason: DI water is added to dilute the samples if concentration is deemed to be too high
The amount/volume of periplasmic proteins are to load, are calculated by dividing the mass of protein (constant fixed at 10ug) with the concentration of protein obtained using Bradford assay. DI water is used to top up the remaining volume to 10ul. Total volume of sample + sample buffer + DI water should be 20 ul. 20ul is the maximum capacity of well
3 Centrifuge the eppendorf tubes for 7 seconds at 16 000xg
Reason: This is to prevent air bubbles from forming during pipetting and ensures homogenous mixing of sample with the sample buffer
Prepare Running Buffer
1. Add 100ml of TGS running buffer (10X) to 900ml of DI water using a measuring cylinder
Reason: This is to dilute the TGS buffer 10X. It is more practical to have 1 bottle of concentrated TGS rather than 10 bottles of diluted TGS buffer as it saves space
Assembly of Xcell SureLock Mini-Cell
1. Fill Upper and Lower Buffer Chamber with 1X TGS running buffer
Reason: TGS running buffer contains ions for migration of protein when applied to an electric field
2. Gently remove the gel comb and peel tape off from gel cassette
3. Insert the gel comb into the Xcell SureLock Mini-Cell and lock it into place using the Gel Tension Wedge.
4. Load 20ul of sample into the each of the wells (* Load from 2nd well onwards as 1st well is for the protein ladder )
5. Load 8.0ul of protein ladder into the 1st well of the Zymogram gel
Reason: Protein ladder helps to track the migration of protein during electrophoresis
6. Close cover of the Xcell SureLock Mini-Cell
Reason: Ensures that electrophoresis can begin
Electrophoresis
1. Switch on the power supply and ensure that the electrodes are connected
2. Run the gel at 120 V for 90 minutes ( The optimal voltage for running the gel is 120 volts. Running the gel at very high voltages (e.g. 200 volts) leads to the generation of intense heat, which may denature the proteins. Running at too low voltages may result in long duration before electrophoresis is complete. )
Removal of gel after electrophoresis
1. Unlock the Gel Tension Wedge and remove the comb from the Xcell SureLock Mini-Cell
2. Use the gel knife to separate the plates and extract the 10% Zymogram gel and placed on plastic tray
3. Rinse the gel with DI water
Reason: To wash away the TGS running buffer and SDS
4. Add 100ml of renaturation buffer (contains Triton-X and detergent) and incubate with gentle agitation for 30 minutes
Reason: This is to allow proteins to renature back to its teritiary structure
5. Decant the renaturation buffer
6. Add 50ml of Developing buffer and incubate with gentle agitation for 30 minutes
Reason: This is to allow proteases to exhibit enymatic activity on the Zymogram by digesting the gelatin
7. Decant the Developing buffer
8. Add 50 ml of Developing buffer and incubate at 37°C overnight for 20 hours
Reason: This is to allow proteases to exhibit enymatic activity on the Zymogram by digesting the gelatin. The purpose of developing twice is to allow the proteins to adapt to the gradual change from renaturation to developing buffer.
9. Decant the Developing buffer
10. Add Biorad Biosafe Coomassie Blue G-250 stain and incubate with gentle agitation overnight
Reason: Ensure that the Zymogram gel is fully submerged in the stain. Biorad Biosafe Coomassie Blue G-250 stains the entire Zymogram gel blue in colour
11. Decant Biorad Biosafe Coomassie Blue G-250 stain
12. Add MilliQ water (destaining solution) and incubate with gentle agitation overnight
Reason: This is to destain the gel and only areas that protease have exhibited enzymatic activity on the gel will appear as clear bands against a dark blue blackground
Timescale
The whole proccess of running a 1D-zymogram takes about 3 days. 1 day is attributed to the actual electrophoresis, 1 day for staining and another day for the destaining proccess.
The results of a 1D-zymogram
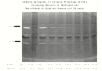
Picture is taken from: astro.temple.edu
The quantity and size of clearings (transparent bands) indicate the amount of protease enzymatic activity on the gelatin substrate of the gelatin gel. S. maltophilia of different isolates can be screened using this methodology to determine which isolate produce the most interesting (most quantity and largest clearings) on the 1D-Zymogram. This isolate can then be further analysed using a 2D-Zymogram.
Sorry for the long entry guys, hope it won't bore you. Thanks alot, and enjoy the last 2 weeks!
From: Benjamin Ma Xianwei
Class: TG01
0606181F
Sunday, October 19, 2008
Week 17 SIP
Hi
This week its my turn to post a blogging post of my experience in my lab. For this week I am attached to my company’s satellite lab. A satellite lab is like an assistant towards the main lab handling samples collected from clinics. However a satellite lab is limited in terms of the number of test that can be done. This is due to a much smaller space to place adequate number of machines. Some machines that is used is also different from the main lab.
However I will be posting about a test, which I did in microbiology department, which I was posted into about 3 weeks ago. It is a routine test to detect the presence of gram-positive Staphylococcus aureus. Staphylococcus aureus is one of the most frequently encountered pathogens in clinical specimens. The rapid distinction between this species to other less virulent Staphylococci is very crucial and vital for an appropriate patient management. The test for the detection of free coagulase production permits the identification of staphylococcus aureus. The test reagent used is PASTOREX STAPH-PLUS to perform the coagulase test.
PASTOREX STAPH-PLUS is a rapid slide agglutination test for the simultaneous detection of the fibrinogen affinity, protein A and the capsular polysaccharides of Staphylococcus aureus.
The principle of PASTOREX STAPH-PLUS test reagent was designed to allow simultaneous detection of the following 3 components:
1 Fibrinogen affinity factor, also referred to as bound coagulase or “clumping factor”
2Protein A, which possesses an affinity for the crystallisable fragment(Fc) of gamma immunoglobumins (IgG).
3 Capsular polysaccharides of Staphylococcus aureus.
PASTOREX STAPH-PLUS reagent is made of latex particles sensitized by fibrinogen and IgG as well as specific monoclonal antibodies raised against capsular polysaccharides of Staphylococcus aureus. The combination of fibrinogen, IgG and anti-capsular monoclonal antibodies in the same reagent allows the recognition of highly encapsulated strains of Staphylococcus aureus as well as poorly encapsulated strains. For highly encapsulated strains, anti-capsular polysaccharides antibodies agglutinate the bacteria. For strains that have lost their polysaccharide capsule, the bacteria are agglutinated by fibrinogen and IgG.
Steps and procedures involved.
1 Place a drop of PASTOREX STAPH-PLUS
2 Inoculate a pure strain of bacteria colony from an agar plate and placed onto a clean glass slide.
3 Mix the reagent and the bacteria colony well
4 Observe for any agglutination. If there is agglutination, it means the bacteria colony is gram-positive Staphylococcus aureus.
Ivan Ng
TG01
Sunday, October 12, 2008
Week 16 SIP
Hi
I have been attached to cytology for 3 weeks.
What is cytology?
Cytology is the study of cells obtain from bodily fluids.
The cytology department receives any fluid from the body such as CSF, aspirates, FNA, smears from urinary tract, reproductive system and so on. They split all the specimens into 2 categories, gynaecological and non-gynaecological. The gynae category means Pap smears (female reproductive tract from vaginal to cervical smears). Non-gynae is everything else.
Pap stands for Papanicolaou stain. It screens to detect premalignant and malignant tissues, mainly from the cervix.
How to take a Pap smear?
I "tooth-brush" like device is used to scrap cells from the opening of the cervix. The medical officer will rotate 360 degrees to gather cells from as large area as possible (to prevent false negative because some areas may not be scrapped). Then they will be smeared onto a slide and stained using the Pap staining method.
Instead of the usual H&E staining, gynae staining is slightly different. They have modified Eosin Azure instead of the normal Eosin, orange G stain and harris haematoxylin. Orange G stains for keratin, and the eosin is special because gynae cells cannot be stained by normal eosin. (I don't know why.)
The test aims to detect cells which are potentially pre-cancerous. The newest classification of degree of malignancy of gynae cells is called Bethesda system.
1. Atypical glandular cells (AGC)
2. Atypical squamous cells of undetermined significance (ASCUS)
3. Low grade squamous intraepithelial lesion (LSIL)
4. High grade squamous intraepithelial lesion (HSIL)
5. Squamous cell carcinoma
It is recommended that females who have had sex undergo regular Pap smear testing, once a year to once in 5 years. If the results are abnormal, they need to do a confirmatory test, about 6months later again (the same test). Other confirmatory test include colposcopy and HPV DNA testing. I am unsure how these are performed.

http://www.medskul.com/gallery/data/519/Faces_of_high_grade_squamous_intraepithelial_lesion_HGSIL_or_HSIL_.jpg
The above picture shows HSIL.
The main things to look out for to confirm malignancy is to observe the nucleus.
They MUST have these characteristics:
1. Enlargement of nucleus
2. Increase in chromatin density
3. Chromatin appears granular or clumped
4. Loss of reticular characteristics of benign cells
They MAY have these characteristics:
1. Hyperchromasia of nucleus (hyper-extreme, chroma-colour)
2. Polychromasia of nucleus (poly-multiple)
3. Changes of the shape of nucleus
4. Macronucleoli
5. Abnomal mitosis
6. Multiple nucleus per cell
(7. onwards are cytoplasm)
7. Unusual staining of cytoplasm
8. Formation of syncytical sheets with faded outline (I have no idea what it means)
9. Weird shape of cell
Thank you
Ernest
TG01
0606330i
I have been attached to cytology for 3 weeks.
What is cytology?
Cytology is the study of cells obtain from bodily fluids.
The cytology department receives any fluid from the body such as CSF, aspirates, FNA, smears from urinary tract, reproductive system and so on. They split all the specimens into 2 categories, gynaecological and non-gynaecological. The gynae category means Pap smears (female reproductive tract from vaginal to cervical smears). Non-gynae is everything else.
Pap stands for Papanicolaou stain. It screens to detect premalignant and malignant tissues, mainly from the cervix.
How to take a Pap smear?
I "tooth-brush" like device is used to scrap cells from the opening of the cervix. The medical officer will rotate 360 degrees to gather cells from as large area as possible (to prevent false negative because some areas may not be scrapped). Then they will be smeared onto a slide and stained using the Pap staining method.
Instead of the usual H&E staining, gynae staining is slightly different. They have modified Eosin Azure instead of the normal Eosin, orange G stain and harris haematoxylin. Orange G stains for keratin, and the eosin is special because gynae cells cannot be stained by normal eosin. (I don't know why.)
The test aims to detect cells which are potentially pre-cancerous. The newest classification of degree of malignancy of gynae cells is called Bethesda system.
1. Atypical glandular cells (AGC)
2. Atypical squamous cells of undetermined significance (ASCUS)
3. Low grade squamous intraepithelial lesion (LSIL)
4. High grade squamous intraepithelial lesion (HSIL)
5. Squamous cell carcinoma
It is recommended that females who have had sex undergo regular Pap smear testing, once a year to once in 5 years. If the results are abnormal, they need to do a confirmatory test, about 6months later again (the same test). Other confirmatory test include colposcopy and HPV DNA testing. I am unsure how these are performed.
http://www.medskul.com/gallery/data/519/Faces_of_high_grade_squamous_intraepithelial_lesion_HGSIL_or_HSIL_.jpg
The above picture shows HSIL.
The main things to look out for to confirm malignancy is to observe the nucleus.
They MUST have these characteristics:
1. Enlargement of nucleus
2. Increase in chromatin density
3. Chromatin appears granular or clumped
4. Loss of reticular characteristics of benign cells
They MAY have these characteristics:
1. Hyperchromasia of nucleus (hyper-extreme, chroma-colour)
2. Polychromasia of nucleus (poly-multiple)
3. Changes of the shape of nucleus
4. Macronucleoli
5. Abnomal mitosis
6. Multiple nucleus per cell
(7. onwards are cytoplasm)
7. Unusual staining of cytoplasm
8. Formation of syncytical sheets with faded outline (I have no idea what it means)
9. Weird shape of cell
Thank you
Ernest
TG01
0606330i
Monday, October 6, 2008
Week 15 SIP/MP Experience
Hi all! Its been a long time since we've met, hope u guys are having fun in your respective attachments ^_^ Well this is my experience for this week
For this post I will be touching up on Carbon (energy source), Vitamins and Amino Acids or Other Nitrogen Supplements.
The carbohydrate that is used in the plant media that I am making is sucrose, theoretically, glucose and fructose can be substituted in some cases. Sucrose concentration of cell media is usually 2-3%. Carbohydrates are important in the media as very few plant cell lines can supply their own carbohydrates needs by CO2 assimilation during photosynthesis.
Vitamins are needed when plant cells and tissues are grown in vitro, as some vitamins become limiting factors for growth in vitro. Vitamins required for all cell growth, at concentrations ranging from 0.1 to 10.0 mg/litre. Nicotinic acid and pyroxidic acid are added in 0.1-5.0 mg/litre and 0.1-10.0 mg/litre respectively; both are not essential for cell growth. Myo-inositol is commonly included in many vitamin stock solutions, it is a carbohydrate and not a vitamin, but it has been shown to stimulate cell growth in most species.
Amino acids and other nitrogen supplements are added to further stimulate cell growth as they provide plants cells with an immediately available source of nitrogen. Most commonly used organic nitrogen are L-glutamine, L-asparagine and adenine.
Friday, September 26, 2008
Week 14 MP - Inoculation and 2nd inoculation of Stenotrophomonas maltophilia
Hi everyone, for this week, I am going to post the experiments that will be conducted following culturing of S. maltophilia, which are namely the inoculation and 2nd inculation of S. maltophilia.
After the culturing of S. maltophilia on LB agar, single isolated colonies should be observed on the LB agar after an overnight incubation at 37°C. It should be noted that not all strains of S. maltophilia have simialr growth rate, hence some strains of S. maltophilia may not yield colonies after an overnight incubation. Nevertheless, most strains of S. maltophilia produce colonies after an overnight incubation.
Inoculation of S. maltophilia into LB broth
Principle: To allow the growth and adaptation of S. maltophilia in LB broth at 37°C.
Materials needed:
· 1 sterile 20ml Luria-Bertani (LB) broth (in 50ml tubes)
· Plastic inoculating loops
· S. maltophilia
· NUAIRE Biosafety Cabinet Class II (BSC 2)
· 4°C fridge
· 37°C Orbital shaker incubator (for warming and incubation of LB broth)
· 37°C incubator (for culturing purpose)
· 70% ethanol
· Marker pen
· Scott® C-Fold towels
· Parafilm
· Sticky tapes
· Biohazard bag
· A pair of Sourcelink Powder-Free Latex Medical Examination Gloves (PPE)*
· Clean lab coat (PPE)*
· Covered shoes (PPE)*
*PPE-Personal Protection Equipment
Methods:
1. Incubate the sterile 20ml LB broth into the 37°C Orbital shaker incubator.
2. Swab the work surface of BSC 2 with 70% ethanol.
3. Using an inoculating loop, extract a single isolated colony from the LB agar taken from 37°C incubator.
4. Dip the inoculating loop into the 2oml LB broth and mix it.
5. Discard the inoculating loop into the biohazard bag and label the LB broth.
6. Incubate the LB broth at 37°C in 37°C Orbital shaker incubator overnight while shaking the LB broth with the shaker function of the incubator (Note: The cap of the 50ml centrifuge tube (containing the LB broth and S. maltophilia) must be loosen and tape before placing it into the incubator. This is because S. maltophilia is an obligate aerobe and requires oxygen to grow. By shaking allows air circulation and encourages homogeneous growth of S. maltophilia within the LB broth).
7. Parafilm the LB agar into biohazard bag.
8. Swab the work surface of BSC 2 with 70% ethanol.
Explanation of methods:
Step 1: The LB broth must be warmed up to 37°C so that S. maltophilia does not need to adapt to different temperatures and grow optimally at 37°C. 20ml LB broth is chosen but not any other volume is because it was found that 20ml is the optimal volume for growth of S. maltophilia.
Step 2: This is to ensure the work surface is sterile before any work can proceed. Working inside a BSC 2 is necessary to ensure safety of operator as S. maltophilia is classified as a biosafety class II pathogen. A biosafety class II pathogen is pathogenic and is capable of causing diseases in humans.
Step 3: Self-explanatory
Step 4: Mixing is done is ensure all the S. maltophilia is released into the LB broth and ensure S. maltophilia is evenly distributed in the media.
Step 5: The inoculating loop is considered as biohazardous and should be discarded into biohazard bag (proper disposal). Labeling is done to facilitate identification.
Step 6: This is to allow the growth of S. maltophilia in the LB broth.
Step 7: The LB agar plate (containing the remaining colonies of S. maltophilia) should be parafilmed before disposal. It ensures a safe disposal of bacteria. By sealing the LB agar plate, it prevents oxygen from reaching into the plate and kills all the S. maltophilia.
Step 8: This is to disinfect the work surface.
Result: The LB broth turns cloudy, indicating the growth of S. maltophilia.
2nd inoculation of S. maltophilia into LB broth
Principle: To remove dead cells, debris and toxic metabolic waste products from cells of S.maltophilia and re-inoculate cells into fresh LB broth to prevent overcrowding
Materials needed:
· One 20ml of LB broth (containing S. maltophilia from inoculation)
· Three 20ml of fresh LB broth (for 2nd inoculation, 3 for 1 isolate)
· One 40ml of LB broth (for washing)
· Sterile PBS (phosphate buffered saline) (in 50ml tube)
· 37°C Orbital shaker incubator
· CO8000 Cell density meter
· Centrifuge HERMLE Z 383K machine
· BSC 2
· Centrifuge tube rack
· Disposable pipettes
· Pipettor
· Pipette
· Pipette tips
· 4 cuvettes (1 blank, 3 for each isolate)
· 70% ethanol
· Marker pen
· Scott® C-Fold towels
· Biohazard bag
· Waste bottle
· A pair of Sourcelink Powder-Free Latex Medical Examination Gloves (PPE)*
· Clean lab coat (PPE)*
· Covered shoes (PPE)*
*PPE-Personal Protection Equipment
Methods:
1. Incubate three 20ml LB broth into the 37°C Orbital shaker incubator.
2. Centrifuge the 20ml LB broth (containing the S. maltophilia from inoculation) at 3000xg at 10°C for 20 minutes.
3. Swab the work surface of BSC 2 with 70% ethanol.
4. Decant the supernatant into the waste bottle.
5. Resuspend the cell pellet with 10ml LB broth.
6. Centrifuge at 3000xg at 10°C for 20 minutes.
7. Decant the supernatant into the waste bottle.
8. Resuspend the cell pellet with 10ml LB broth.
9. Centrifuge at 3000xg at 10°C for 20 minutes.
10. Decant the supernatant into the waste bottle.
11. Resuspend the cell pellet with 20ml LB broth.
12. Prepare 4 cuvettes (1 blank and 3 for sample - 1000ul PBS acts as blank and 100ul S. maltophilia + 900ul PBS for each cuvette).
13. Take OD600 readings (3 times and take an average) using CO8000 Cell density meter .
14. Calculate the volume of S. maltophilia required to inoculate into each 20ml LB broth to achieve 5X10^7 cells in each 20ml LB broth.
15. Pipette the calculated volume of S. maltophilia in 20ml LB broth into the each of the 3 fresh 20ml LB broth.
16. Incubate the three 50ml tubes of 20ml LB broth at 37°C in the 37°C Orbital shaker incubator for 16 hours (Note: The cap of the 50ml centrifuge tube (containing the LB broth and S. maltophilia) must be loosen and tape before placing it into the incubator. This is because S. maltophilia is an obligate aerobe and requires oxygen to grow. By shaking allows air circulation and encourages homogeneous growth of S. maltophilia within the LB broth).
17. Discard the remaining LB broth (from inoculation) and wastes into biohazard bag (if full, autoclave the bag).
18. Swab the work surface of BSC 2 with 70% ethanol.
Explanation of methods:
Step 1: The LB broth must be warmed up to 37°C so that S. maltophilia does not need to adapt to different temperatures and grow optimally at 37°C. 20ml LB broth is chosen but not any other volume is because it was found that 20ml is the optimal volume for growth of S. maltophilia.
Step 2: This is to obtain the cell pellet and discard any supernatant (contains dead cells, waste products of cells etc)
Step 3: This is to ensure the work surface is sterile before any work can proceed. Working inside a BSC 2 is necessary to ensure safety of operator as S. maltophilia is classified as a biosafety class II pathogen. A biosafety class II pathogen is pathogenic and is capable of causing diseases in humans.
Step 4: Self-explanatory
Step 5- 10: The cells (S. maltophilia) are washed twice to remove any dead cells, debris and waste products that may affect the growth of S. maltophilia.
Step 11: Since the cells are ultimately inoculated into 20ml LB broth, we should resuspend the cells into similar volume of LB broth before taking of OD600 readings.
Step 12-13: The blank is used for taring of the cell density meter and the cells are diluted 10X before taking OD600 readings.
Step 14: Formula is as follows- (5X10^7)/(Average OD600 reading X 10^10) X 1000
Step 15: The reason for inoculating into three 20ml LB broth is to prevent overcrowding of cells.
Step 16: To allow the growth of S. maltophilia at 37°C .
Step 17: All wastes are considered biohazardous and should be autoclaved.
Step 18: To disinfect the work surface.
Results: The LB broth turns cloudy, indicating the growth of S. maltophilia.
The next experiment will be chloroform shock to extract the periplasmic proteins of S. maltophilia. Please refer to Benjamin's post for more details on chloroform shock.
Alright, till next time...!
Han Yang
TG01
0606190G
Saturday, September 20, 2008
Week 13 - Pre-electrophoresis Preparation for running a gel
Heya guys, long time no see. In a blink of an eye, 13 weeks of SIP/MP have already past. Next week is our 3rd campus discussion and hope to see you all soon. By the way, please refer to Miss Chew's blog for updates regarding whether there is a blog quiz.
Today, I am going to share on one of two methods of pre-electrophoresis preparation steps that are required for my project. The gels that i will be running are 1D-Zymogram, 2D-gel and 2D-Zymogram and the pre-electrophoresis preparation is essential for running the gels mentioned above. To refresh your memory, Zymography is an electrophoresis technique that is used in the detection of protease activity under non-denaturing conditions. It is performed on a zymogram gel, which incorporates the use of a substrate that is copolymerized with polyacrylamide gel . Proteases that catalyze Gelatin , Caesin or Fibrin as a substrate will show up as clearings against a dark blue background after staining with Commassie brilliant blue. (Please read on previous post entry for more information regarding zymogram )
Wthout further ado, the two Pre-electrophoresis preparation steps are Bradford assay and TCA (Trichloroacetic acid) precipitation. In this post, the focus will be on Bradford assay.
Principle of Bradford assay: Bradford assay is a protein colormetric assay that will produces a colour change if proteins are present. The coomassie dye is originally red in colour. However in the presence of protein binding, it changes colour and stabalises into coomassie blue, resulting in an absorbance shift. This happens because of 2 bond to bond interactions taking place. The red form of commassie dye donates free proton to ionized groups on protein disrupting its conformation. This leads to hydrophobic heads of the proteins being exposed. The expose hydrophobic pockets on protein chain bind to non-polar region of the dye by van der waals force. Hence, this positions the positive amine groups closely to negative charge of the dye. Ionic interaction further strengthens the bond and ther is blue coomassie dye. Binding of the protein stabilises blue form of coomassie dye and the complex is measured for protein concentration by absorbance reading at 595nm. If no protein is bound to the dye, the cationic (unbound form) are green or red while binding stabalises the anionic (bound form) are blue in colour.
By using Bradford assay, the periplasmic protein concentration in the supernatant can be determined. The mass of periplasmic proteins remained at a constant at 10ug. By knowing the mass and protein concentration of the protein, the volume of protein sample to be loaded into the wells of the gel can be determined. This is because of the formula: Concentration (ug/ul) = Mass (ug) / Volume (ul). The volume can be found by manipulating the formula: Volume = Mass / Protein concentration (determined by Bradford assay).
Methods and Explanation
1. Warm up Bradford dye reagent to room temperature
It will not affect the sample at cold temperature and works optimally at room temperature
2. Pour Bradford dye reagent to plastic tray and cover with aluminium foil
Bradford reagent is light sensitive and cannot be exposed to light
3. Prepare the centrifuge tubes and mixed in the appopriate standards ( Milli Q + BSA)
Allows a calibration curve to be plotted
4. Prepare the sample in 5X dilutions
This ensures that there will be enough sample left after pipetting, hence need to prepare excess
5. Centrifuge standards and sample (short spin for 7 seconds)
To thoroughly mixed the milli Q and BSA/sample
6. Pipette 5ul of sample or standards in triplicates into each well using reverse pipetting (microtitre plate)
Ensures average readings can be taken after spectrophotometry for accurate results
7. Add 250uL bradford reagent into each well using multichannel pipette and reverse pipetting
Reverse pipetting to ensure exactly 250uL bradford is actually added and not more or less. It also prevents air bubbles forming
Allows binding of bradford to proteins for spectrophotometry
8. Remove air bubbles present using a pipette tip dipped with ethanol
Prevent air bubbles in samples, lead to inaccurate results
9. Cover microtitre plate with aluminium foil and incubate 30 minutes
Allow the reaction to occur at room temperature
10. Set up the spectrophotometer
To measure absorbance reading at 595 nm and to quantitate amount of proteins
The need to use BSA Standards: BSA standards are prepared at the concentration of 0, 0.1, 0.25, 0.5, 0.75mg/ml to obtain a linear range (standard curve). When the commassie blue dye binds to the protein, absorbance reading is read using spectrophotometer and absorbance reading is interpolated to the linear range of Bradford Assay. The protein concentration can thus be obtained.
That's all for now. Thanks you for reading my post and have an enjoyable next 7 weeks!
From: Benjamin Ma
Class: TG01
0606181F
Sunday, September 14, 2008
Week 12
This month I will be introducing to you guys about a new method that I learnt in the microbiology department how to detect the presence of occult blood in stools specimens.
My company uses a kit called Hema-Screen. It is a guaiac slide test for the qualitative detection of fecal occult blood. It is a useful aid in diagnosis of a number of gastrointestinal disorders.
The detection of occult blood is critical to many gastrointestinal diseases. The presence of occult blood in fecal material may indicate gastrointestinal pathology such as hemorrhoids, diverticulitis, fissures, colitis or colorectal cancer. Hence Hema-Screen is a simple, aesthetic, inexpensive test designed for the use in collection and preparation of stool specimens. It overcomes the instability of guaiac solution and the hypersensitivity of benezidine and ortho-tolidine.
The principle of the test is as follows. Hema-screen is composed of guaiac impregnated paper enclosed in a cardboard frame, which permits sample application to one side, and development and interpretation on the reverse side. The process involves placing 2 specimens onto the guaiac paper.
Hema screen, like all guaiac paper test for occult blood, is based on the oxidation of phenolic compounds present in the guaiac to quinines resulting in production of the blue color. Because of its similarity to the prosthetic group of peroxidase, the hematin portion of the hemoglobin molecule can function in a pseudoenzymatic manner, catalyzing the oxidation of guaiac. So when a fecal specimen containing occult blood is applied on the test paper, contact is made between hemoglobin and the guaiac. A pseudoperoxidase reaction will occur upon addition of the developer solution, with a blue chromagen formed proportionally to thee concentration of hemoglobins. The color reaction will occur after 30 seconds.
If a positive result is obtained with the test, a follow-up with additional diagnostic tests, as soon as possible, is essential. As with any occult blood test, results with Hema-Screen cannot be consider conclusive evidence of the presence or absence of gastrointestinal bleeding or pathology. The test is not intended as a replacement for other diagnostic procedures such as proctosigmoidoscopy examination, barium enema, and X-ray studies.
Ivan Ng
TG01
0605070B
Saturday, September 6, 2008
Week 11
Hi
I will be sharing about shaving, embedding and alittle on special stains. (Because I've only started on special stains two days ago)
----------------------------------------------------------------------------------
Shaving of blocks, also known as trimming of blocks.
In the histopathology department, most blocks are trimmed before they are sectioned. The purpose is to allow the tissue to be fully exposed before sectioning. It is required that as much area is exposed, to allow the pathologist to read a greater area of tissue.
The greater the area, the higher chances that the pathologist will read it correctly. ie lesser false negatives.
Occassionally, there will be staple bullets and sutures in the blocks. (Sutures are sugical threads) Where do they come from? When the surgeons operated on the patients, they staple the organs/tissues or tie sutures around them to allow orientation. Thus, when pathologist cut these tissues, they may also put these sutures and staple bullets into the cassettes and sent for processing. Sutures and staple bullets do not interfere in tissue processing but they will damage the microtome blade. It MAY damage the tissue processor IF the tissue processor uses microwave technology. If a metallic object is placed in a microwave, a "mini-thunderstrom" will occur in the microwave.
Microwaves electrically charge the air between a metallic object and the metal contained in the oven walls. This ionized air produces an electric current like a small lightning bolt.
Shaving is done using a blunt reused blade (to save money) and is cut at 20um at each swipe of the blade. However, there is a speed up button. When you hold down the button, it is cut at 50um or double the cutting distance. This would help the user speed up shaving. However, we must be cautious when holding this button because when we encounter small tissue, we may over-cut it and the whole tissue gets cut-away.
After the blocks are trimmed, they are softened using a strong detergent. Why? Because some tissues are hard like fibroids. It would be difficult to section. What about bones? They are the hardest thing in the human body. A strong detergent would not be able to soften them. In this case, we use a decalcifying agent to remove calcium from bones. Calcium crystals is what makes the bones hard. A mild acid is enough to decalcify bones.
Softening is done in 5minutes and decalcification is done for a few hours.
----------------------------------------------------------------------------------
In embedding, the basket of tissues are removed from the tissue processor and placed on the heated surface of the embedding machine. Next, we would account for all the cassettes, we must ensure that all the cassettes are present. This is done by checking with the checklist, which is written before the cassettes are placed in the processor. Once the number of cassettes are checked, we would next need to count the number of tissues in the cassette, which corresponds to the number written on the cassettes. For example, if the cassette is written x3 or x6, there must be 3 and 6 tissues present respectively. If there are not, we must report it immediately as the tissues may have dropped out during processing. If this is left unreported, we would be held responsible for any missing tissues.
Picture taken from http://pathology.utscavma.org/wp-content/uploads/2008/03/path-club-pics-024.JPG
Then, we select the most appropriate size mould.
Picture taken from http://www.tedpella.com/embed_html/27185.jpg
If we select a mould that is too big, we would be wasting wax. If the mould is too small, there wouldn't be enough "grip" onto the slides. Wax is needed to grip onto the slides during sectioning.
First, pour alittle moulten wax into the mould, then place the tissue onto the mould. Gently press the tissue down so that it is flat. (Shaving would be easier if we press down the tissue. Remember what I said? We must expose as much area as possible) Then, we place the empty cassette over the mould, without the cassette cover. Pour alittle more wax and voila! Let the block cool down on the cold plate. After 5 mins or so, we can pluck out the block from the mould.
----------------------------------------------------------------------------------
I will touch alittle on special stains.
Namely, the difference between PAS and PASD. This is the only manual stain I have done so far.
PAS stands for Periodic acid-Schiff. It stains glycogen in tissues. How? The periodic acid reacts by oxidizing the glucose residues and creates aldehydes that reacts with the schiff reagent. This creates a magenta colour (purple). A counter stain will then be used, usually a basic dye. In my lab, we use haematoxylin, to stain the nucleus.
The D in PASD stands for diastase. It is an enzyme which breaks down glycogen. In the past, lab technicians can use their sailva because saliva contains amylase. However, our saliva contains many impurities, thus it is not ideal. The commercial diastase is recommended. Since PAS stains glycogen and diastase breaks down glycogen, PASD is the negative control. A light pink colour would be present instead of the magenta. Often, PAS and PASD are performed together on the same slide but different tissues. Differences in the intensities of the 2 stains can roughly quantify the glycogen concentration. Ulitmately, PASD is to ellucidate gastic duodenal metaplasia, commonly found in dudenal adenomas.
----------------------------------------------------------------------------------
Thank you
Ernest
TG01
0606330i
I will be sharing about shaving, embedding and alittle on special stains. (Because I've only started on special stains two days ago)
----------------------------------------------------------------------------------
Shaving of blocks, also known as trimming of blocks.
In the histopathology department, most blocks are trimmed before they are sectioned. The purpose is to allow the tissue to be fully exposed before sectioning. It is required that as much area is exposed, to allow the pathologist to read a greater area of tissue.
The greater the area, the higher chances that the pathologist will read it correctly. ie lesser false negatives.
Occassionally, there will be staple bullets and sutures in the blocks. (Sutures are sugical threads) Where do they come from? When the surgeons operated on the patients, they staple the organs/tissues or tie sutures around them to allow orientation. Thus, when pathologist cut these tissues, they may also put these sutures and staple bullets into the cassettes and sent for processing. Sutures and staple bullets do not interfere in tissue processing but they will damage the microtome blade. It MAY damage the tissue processor IF the tissue processor uses microwave technology. If a metallic object is placed in a microwave, a "mini-thunderstrom" will occur in the microwave.
Microwaves electrically charge the air between a metallic object and the metal contained in the oven walls. This ionized air produces an electric current like a small lightning bolt.
Shaving is done using a blunt reused blade (to save money) and is cut at 20um at each swipe of the blade. However, there is a speed up button. When you hold down the button, it is cut at 50um or double the cutting distance. This would help the user speed up shaving. However, we must be cautious when holding this button because when we encounter small tissue, we may over-cut it and the whole tissue gets cut-away.
After the blocks are trimmed, they are softened using a strong detergent. Why? Because some tissues are hard like fibroids. It would be difficult to section. What about bones? They are the hardest thing in the human body. A strong detergent would not be able to soften them. In this case, we use a decalcifying agent to remove calcium from bones. Calcium crystals is what makes the bones hard. A mild acid is enough to decalcify bones.
Softening is done in 5minutes and decalcification is done for a few hours.
----------------------------------------------------------------------------------
In embedding, the basket of tissues are removed from the tissue processor and placed on the heated surface of the embedding machine. Next, we would account for all the cassettes, we must ensure that all the cassettes are present. This is done by checking with the checklist, which is written before the cassettes are placed in the processor. Once the number of cassettes are checked, we would next need to count the number of tissues in the cassette, which corresponds to the number written on the cassettes. For example, if the cassette is written x3 or x6, there must be 3 and 6 tissues present respectively. If there are not, we must report it immediately as the tissues may have dropped out during processing. If this is left unreported, we would be held responsible for any missing tissues.

Picture taken from http://pathology.utscavma.org/wp-content/uploads/2008/03/path-club-pics-024.JPG
Then, we select the most appropriate size mould.

Picture taken from http://www.tedpella.com/embed_html/27185.jpg
If we select a mould that is too big, we would be wasting wax. If the mould is too small, there wouldn't be enough "grip" onto the slides. Wax is needed to grip onto the slides during sectioning.
First, pour alittle moulten wax into the mould, then place the tissue onto the mould. Gently press the tissue down so that it is flat. (Shaving would be easier if we press down the tissue. Remember what I said? We must expose as much area as possible) Then, we place the empty cassette over the mould, without the cassette cover. Pour alittle more wax and voila! Let the block cool down on the cold plate. After 5 mins or so, we can pluck out the block from the mould.
----------------------------------------------------------------------------------
I will touch alittle on special stains.
Namely, the difference between PAS and PASD. This is the only manual stain I have done so far.
PAS stands for Periodic acid-Schiff. It stains glycogen in tissues. How? The periodic acid reacts by oxidizing the glucose residues and creates aldehydes that reacts with the schiff reagent. This creates a magenta colour (purple). A counter stain will then be used, usually a basic dye. In my lab, we use haematoxylin, to stain the nucleus.
The D in PASD stands for diastase. It is an enzyme which breaks down glycogen. In the past, lab technicians can use their sailva because saliva contains amylase. However, our saliva contains many impurities, thus it is not ideal. The commercial diastase is recommended. Since PAS stains glycogen and diastase breaks down glycogen, PASD is the negative control. A light pink colour would be present instead of the magenta. Often, PAS and PASD are performed together on the same slide but different tissues. Differences in the intensities of the 2 stains can roughly quantify the glycogen concentration. Ulitmately, PASD is to ellucidate gastic duodenal metaplasia, commonly found in dudenal adenomas.
----------------------------------------------------------------------------------
Thank you
Ernest
TG01
0606330i
Sunday, August 31, 2008
Week 10 SIP/MP


Pictures for the vitro vents requested.
Hello all, after reading the comments in my last post, I have decided to explain the different components of the media and I hope that everyone will understand better why the different components must be added.
MEDIA
Media components
The composition of the plant media is important for the plant media to grow properly. Plant tissue is usually made up of the following components: macronutrients, micronutrient, vitamins, amino acid or other nitrogen supplements, sugar(s), other undefined organic supplements, solidifying agents or support systems and growth regulators. For this post, I will be touching on macronutrients, micronutrients.
The media formulation that is used- Murashige and Skoog formulation contains the macronutrients and micronutrients. Macronutrients provide 6 major elements needed for plant growth: Nitrogen, Phosphorous, Potassium, Calcium, Magnesium and Sulfur. 25-60 mM of inoraganic nitrogen is needed in a culture for adequate plant growth. Potassium is needed for cell growth of plant species, most media have potassium in the nitrate, sulfate or choride form at concentration of 20-30 mM. The rest of the elements: Phosphorous, Magnesium, Sulfur and Calcium are included at concentrations ranging from 1-3 mM. Higher concentrations of these nutrients may be needed if dificiency of other nutrients are present. Micronutrients are elements such as Iron, Manganese, Zinc, Boron, Copper and Molybdenum. Chelated form of iron and zinc are commonly used, with Iron being very important. Iron citrate maybe used in culture media but the compounds are had to dissolve and usually precipitate out after media is done. Murashige and Skoog uses ethylene diaminetetraacetic acid-iron chelate to overcome this problem. Sodium and Chlorine are also used in some medium but are not essential for growth. Iron and Molybdenum are added at concentrations of 1 microM, Zinc at 5-30 microM, Manganese at 20-90 microM, Boron at 25-100 microM and Copper at 0.1 microM
Sunday, August 24, 2008
Week 9 MP - Culturing of Stenotrophomonas maltophilia
Hi everyone...! I have changed my MP due to some unforseen circumstances (which I shall not elaborate further) and it will be somehow similar to Benjamin's MP.
MP title: Development of 2D-Zymogram protocols to detect and identify Stenotrophomonas maltophilia periplasmic proteases and compare their activity at 37°C vs 28°C.
Quick facts on Stenotrophomonas maltophilia (S.maltophilia)
MP title: Development of 2D-Zymogram protocols to detect and identify Stenotrophomonas maltophilia periplasmic proteases and compare their activity at 37°C vs 28°C.
Quick facts on Stenotrophomonas maltophilia (S.maltophilia)
- Previously known as Pseudomonas maltophilia or Xanthomonas maltophilia
- Sole member of the genus, Stenotrophomonas
- Gram-negative bacillus (rod-shaped) which is gram-stained pink
- Aerobic (require oxygen to grow and survive)
- Non-fermentative
- Motile by means of flagella
- Found widely in environment and hospitals
- Infects immunocompromised individuals especially
Why study S.maltophilia ?
- Important nosocomial pathogen
- Highly antibiotics resistant
- Little is known of its virulence factors, genetic structure and pathogenicity
- Ageing population
- Increased use of surgical equipments
Culturing of S.maltophilia
Principle: To allow the growth of S.maltophilia on LB agar plate and to obtain single, isolated colonies of the bacterium.
Materials
- S.maltophilia isolates (in vials, frozen state)
- Disposable inoculating loops
- LB agar
- 37°C incubator
- Biosafety cabinet 2 (BSC 2)
- 70% ethanol
- Marker pen
- Biohazard bag
- Appropriate personal protection equipments (e.g. Lab coat, covered shoes and gloves)
Methods
- Set up BSC 2.
- Dry LB agar in 37°C incubator.
- Swab vials (containing S.maltophilia isolates), inoculating loops and LB agar with 70% ethanol.
- Place the necessary materials into the BSC 2 and arrange them orderly.
- Label the LB agar plate.
- Streak on the LB agar plate with an inoculating loop (with S.maltophilia).
- Dispose used inoculating loops into biohazard bag.
- Swab the LB agar plate with 70% ethanol before incubating at 37°C overnight.
- Observe for single, isolated colonies.
Explanation of methods
1) To provide a sterile environment for culturing to prevent any contamination. To protect the user from S.maltophilia (safety reason).
2) To prevent the formation of water droplets from condensation as the LB agar are stored in the fridge.
3) Aseptic techniques
4) To facilitate workflow within the BSC 2.
5) To facilitate identification of S.maltophilia isolate.
6) To transfer S.maltophilia onto the LB agar plate.
7) Used inoculating loops are considered biohazard wastes and should be disposed in biohazard bag and autoclave later.
8) To disinfect the outer surface of LB agar plate with 70% ethanol before incubation. Incubation at 37°C overnight allows growth of S.maltophilia optimally.
9) This shows that streaking was done properly (recall streaking techniques from Basic Microbiology) and the colonies will be used for subsequent experiment such as inoculation.
That's all for this week!
Tan Han Yang
0606190G
TG01
Saturday, August 16, 2008
Week 8 SIP - Chloroform Shock
Hello everyone. It is the 8th week of SIP/MP and its my turn to blog again. This week I will blog on Chloroform Shock its relevance to my project.
Chloroform Shock is a method which is commonly used in the extraction of periplasmic proteins of gram-negative bacteria. Gram-negative bacteria is not only enclosed by its cell membrane, but also a periplasm. Many periplasmic proteins can be found within the periplasmic space (the region between the inner and outer membrane) of the bacteria. Hence, to extract these periplasmic proteins, chloroform is used.
Chloroform is a solvent which is relatively unreactive, miscible and volatile. It has to be said the exact mechanism of action of chloroform shock is currently not known. However, scientiests have been using this technique to extract periplasmic proteins. It is postulated that chloroform form pores in the outer cell wall of the gram-negative bacteria and releasing periplasmic proteins out into the extracellular environment. The optimal time for chloroform to work is 15 minutes for extract of periplasmic proteins only. If the time taken is too short, it may not have reached/penetrate the periplasmic space and periplasmic proteins are not extracted. When the time taken is too long, it may penetrate the periplasmic space and will extract other intracellular proteins as well, such as cell membrane proteins which is irrelevant to my project. Thus, great care must be taken to ensure reaction of the bacteria (cell pellet) with chloroform is 15 minutes exactly.
The use of chloroform is not without its risks. The bottle of chloroform is always opened within the Biosafety Level II Cabinet (which i am using) and not outside it. This is because accidental inhalation can be bad for the health. The role of the Biosafety Cabinet level II is to protect the user as well as the speciman. In Class II cabinets, there is always stream of inward air moving into the cabinet. This is called the inflow and prevents the aerosol generated during any microbial work, to escape out of the Cabinet (air can only flow into the BSC but not out). The inflow can only reach the front inlet grill, just in front of the operator. This is to ensure that unfiltered air outside the BSC cannot enter the BSC and thus there will not be any contamination. A special feature of BSC Level II cabinet is the HEPA-filtered air stream which causes air stream to flow downwards inside the BSC after sucking air from above and filtered. This flushing is called downflow and protects samples within BSC from contamination. In the case where chloroform is accidentally inhaled or consumed, it can depress the nervous system and cause dizziness, fatigue and headache. Hence the appropriate personal protective equipment to wear is a pair of gloves, labcoat and work inside the Biosafety Level II cabinet when performing chloroform shock.
Basic Outline of Chloroform Shock (sorry i cannot give the full details such as centrifuge speed, volume, etc as my supervisor do not allow, hence here is only the basic workflow)
1. Centrifuge to obtain cell pellet (from broth culture)
2. Wash cell pellet
3. Resuspend with PBS (phosphate buffer saline)
4. Repeat step 1 and 2 three times
5. Take OD600 reading
6. Calculate volume of cells to dispense into 5 eppendorf tubes
7. Centrifuge the 5 eppendorf tube
8. Decant supernatant and mix gently
9. Add chloroform and incubate 15 minutes
10. Add Tris-HCl
11. Centrifuge the eppendorf tubes
12. Extract the periplasmic proteins from the supernatant
Thanks for taking your time to read my entry and have an enjoyable and fruitful SIP for the next 12 weeks.
From: Ma Xianwei Benjamin
Class: TG01
0606181F
Monday, August 4, 2008
This would be my second posting about my SIP. Today I will be talking about how do you detect presence of Dengue antibodies in patient’s serum.
Firstly I will discuss about the introduction of Dengue virus. Dengue is a flavivirus, it is found in large areas of the tropics and subtropics. Transmission is by mosquito, principally Aedes aesgypti and Aedes albopictus. Dengue virus infection causes a spectrum of clinical manifestations ranging from symptomatic to fatal hemorrhagic disease. Classic dengue is characterized by sudden onset of fever, intense headache, myalgia, arthralgia and rash. A dysphasic febrile course is common, as it is insomnia and anorexia with bitter or loss of taste. Dengue hemorrhagic fever and dengue shock syndrome are severe complications often associated with secondary dengue infection.
In endemic regions, patients diagnosed with dengue fever generally have secondary infection. Consequently, detection of antibodies to dengue is valuable procedure, particularly in second and subsequent infections where the occurrence of complications is high. Traditionally, haemagglutination-inhibition (HAI) titers have been used to classify infections as primary or secondary. The current definition depends on an assay of paired serum specimens separated in time by at least 7 days, although any acute specimen with an HAI titer ≥ 1:1280 is defined as coming from a patient with seconday flavirus infections.
My company uses this instrument called Panbio Dengue Duo Cassette. It is for the qualitative presumptive detection of IgM and IgG antibodies to dengue virus in human serum. The assay can be used for the presumptive differentiation between primary and secondary infection. This test should only be used for patients with signs and symptoms that are consistent with dengue virus infection. Positive results are presumptive and must be confirmed by virus isolation, paired serum analysis, antigen detection by immunohistochemistry or viral nucleic acid detection for conifrmation of dengue virus infection.
The sensitivity of this assay has been set so that in patients with primary dengue, IgM is positive while IgG is negative. In contrast, patients with secondary infections will have a postitive IgG result with or without postive IgM result.
The principle of this assay, is when present in the patient sample, dengue-specific IgM or IgG antibodies bind to anti-human IgM or IgG antibodies immobilizied in 2 lines across the cassette membrane. Colloidal gold complexes containing recombinant dengue 1-4 antigens are captured by the bound patients IgM or IgG to give visible pink line(s). a procedural control is included to indicate that the assay has been performed correcty.
By Ivan Ng
TG010605070B
12.15pm
4 August 2008 (Mon)
Saturday, August 2, 2008
Week 6 SIP
Hi,
Week 6 of SIP. I will share my SIP experience chronologically. I am still at histopathology department.
Week 2
There was a talk on how to handle spillage. It was briefed to all staff. Training staff on how to handle chemical spills is important because some chemicals are potentially harzardous or flammable. The key point to remember from the talk is MSDS. Material Safety Data Sheet. It contains all the necessary information regarding the chemical.
Next there was a briefing during emergencies, particularly an outbreak of fire. We were taught on fire safety procedures and evacuation route. After these 2 briefings, there was a small quiz for all staff, which was required by JCI. I scored 12/14.
Week 2 was about the same as the first week. I heated slides to melt the wax, labelled casettes and sorted slides. We also had a rough idea on our major project. To find out the minimum processing time.
Week 3
I labelled chemical bottles in the cabinet. We have to check the expirary date, date of opening and batch number. I was assigned to do this because there is a JCI inspection next week. We have to ensure all chemicals and materials are accounted for and not expired.
Apart from checking chemicals, I did slide sorting for the whole week. A recap: we have to sort according the the biopsy number eg. 08-12345, then followed by the block number eg. A3, then by the number of levels being cut. eg. VL 2.
For example, this is how we arrange it.
(A1 vl 1/3 08-19000)
(A1 vl 2/3 08-19000)
(A1 vl 3/3 08-19000)
(A2 08-19000)
(B1 08-19000)
(A1 08-19001)
(A2 vl 1/2 08-19001)
(A2 vl 2/2 08-19001)
(A1 08-19005)
Notice that some blocks do not have "vl" because the block is only cut once. Meaning only one layer is cut. vl stands for variable level. The 08 in the biopsy number 08-xxxxx, stands for the year, 2008.
Apart from sorting, I rearranged boxes of blocks in the store room. We have to keep blocks for at least 5 years. Just in case the doctors requires a re-examination when a patient suffers a relapse or the doctor made a mistake 5 years ago.
Week 4
JCI inspection week. We didn't do much work this week because the auditors from JCI may come any day. JCI inspection occurs once every 2 years. I heard from one of the staff that there are 3 standards in JCI acceditation, a basic level, silver and gold. Currently, my lab is at the silver standard. After this inspection, it may become gold.
We also managed to collect some tissues this week for our project. But unfortunately for JCI, we weren't able to use it. Furthermore, our machine temporarily malfunctioned on friday.
Week 5
Besides heating and sorting slides, I have started shaving blocks. There are about 500-700 blocks in a day and it is rather tiring to shave all of them. It is fun because I can finally get to use the microtome. Oh and I accidentally cut my finger, fortunately only the skin peeled off, no bleeding. The blade is very very sharp.
Shaving is done at 20 um instead of the usual 4 um that we use for sectioning.
I was on MC one of the days. Apparently, there is a flu bug going around the lab where more than 5 staff have gotten sick, including ying chee. And on Friday, we went back to school for campus discussion. So this week I wasn't around much.
Week 6
Shaving of blocks, fishing, sorting slides, heating. We have started processing our tissues that we collected for our project. it was rather sucessful. One of the staff briefly verified our slides and commented that it was acceptable. We have successfully shortened the time!
I have growned to like shaving very much. Eventhough it requires speed and muscle, my job is very important and we have to be alert, so as not to cut too much or too little.
I have also observed how embedding is performed. It is quite easy for standard tissues but for postate and equally tiny tissues, it is rather difficult. Imagine a short hair. We have to use a forcep to carefully pick it up and put it in molten wax. In addition, we have to press it down using a screw-driver like instument. The trouble is, every time after we press it down, we have to remove the instrument, and the tissue always move away.
Thank you
Ernest
TG01
02/08/08
Sunday, July 27, 2008
Week 5 SIP/MP Experience
Hello all, its been 5 since SIP/MP started and it was great seeing you all on friday again. This week it is my turn to share my SIP/MP experience to you all.
I am attached to a plant biotechnology lab, and under the TSO, I help in making plant media. I make two kinds of plant media. One has activated charcoal in it and one does not. The steps to making the plant media are similar, therefore I shall explain one, and list the constituents of the other.
Preperation of tissue plant media
1.) Fill up two 3Litre beakers to over 2.5L with MilliQ water.*
2.) Place the beakers on seperate magnetic stirrers.
3.) Add the constituents in the following order after weighing them/determining their volume in each beaker. (MS media formulation (Murashige and Skoog)-6.45g; Myo-30ml; Organic elements-30ml sucrose 60g).*
4.) Top up the water until both beakers are 3L full.
5.) Next the pH is adjusted to a range of 5.2 to 5.21 using the pH meter
6.) Activated charcoal(1.5g) is added next and allowed to be distributed in the media.**
7.) Next 30 vitro vents(containers that will carry the media) are prepared.
8.) 1.6grams of agar powder are then poured into each vitro vent.
9.) Next a marked measuring cylinder specially used to measure for the volume needed for each vitro vent is used and the media is poured to fill up all the 30 vitro vents.
10.) The vitro vents are then covered with a cover and autoclaved.
Constituents for second set of plant media
1.) MS 6.45g
2.) Myo 30ml
3.) Organic Elements
4.) Sucrose 30g
5.) pH 5.2-5.21
30 vitro vents
1.6g agar
*Avoid parallax error by placing the eye onthe same level as the meniscus and read the bottom of the meniscus
**The activated charcoal does not dissolve into the media, therefore it must be thoroughly in the media before it is poured into the vitro vents. And after half the beaker is emptied, place the beaker back on the magnetic stirrer to redistrubute all the activated charcoal that has settled down.
I hope my explanation is clear and easy to understand. If there are any questions, please feel free to ask me. Thanks for taking the time to go through this post.
Johan
0606637G
TG01
Sunday, July 20, 2008
Week 4 SIP/MP Experience
Hello my fellow coursemates! How are you guys doing? Hope all of you are doing fine for your SIP and MP. This is the 4th week of SIP/MP and it is my pleasure to share my attachment experience.
I am attached to a research laboratory which study on the effect of polyphenolic chemosensitisers and anticancer drugs on tumour cells. Some examples of anticancer drugs include melphalan, chlorambucil and etc. Both chemotherapy drugs belong to the same class of nitrogen mustard alkylating agents. Melphalan is commonly used to treat multiple myeloma (cancer of plasma cells) and ovarian carcinoma. Chlorambucil is used primarily to treat chronic lymphocytic leukemia (cancer of lymphocytes, with particular to B cells). Some examples of polyphenolic chemosensitisers include 2,2'-dihydroxychalcone and 2'-hydroxy-4-methylchalcone (I shall elaborate more on polyphenolic chemosensitisers in my next post).
In the world today, there are 3 main types of cancer therapies which are chemotherapy, radiotherapy and surgery. Usually, they are used in combination to achieve greater effectiveness in treating tumours. My main focus will be on chemotherapy.
Chemotherapy is decreasing in its effectiveness mainly due to chemoresistance of tumour cells. This is primarily due to the gluthatione (GSH)-related detoxification system which allows tumour cells to be resistant to chemotherapy drugs. I shall elaborate further on this system in my next post.
In my study, I shall be focusing on the effect of 2,2'-dihydroxychalcone and chlorambucil in inducing DNA interstrand cross-links on human colon adenocarcinoma cells (HCACs) grown in-vitro. The HCACs are obtained from ATCC (American Type Culture Collection) and designated by COLO 320 HSR. These cells are grown in RPMI (Roswell Park Memorial Institute) medium and they are loosely adherent to the culture surface. In addition, they appear round and refractile under the inverted microscope. Since they are tumour cells, they divide very rapidly, and thus have high energy requirement.
During the course of my research, I am required to maintain these cells in peak condition so that I will have enough cells to continue my experiments. Hence, I will be applying what I have learnt from Mammalian Cell Technology (MCT) which I have taken as elective subject to part of my research. Without further delay, let me start off with the most fundamental, which is the preparation of the RPMI-1640 medium.
Subject: MCT
Tests:
1)Preparation of RPMI-1640 medium
2)Subculturing of cells
3)Changing of medium
1) Preparation of RPMI-1640 medium
Composition
· 1% sodium pyruvate
· 1% non-essential amino acids
· 1% antibiotics
· 10% fetal bovine serum (FBS)
Materials
· 500ml RPMI-1640 medium (ready-to-use)*
· Fetal Bovine Serum (FBS)*
· Antibiotics*
· Sodium pyruvate*
· Non-essential amino acids (NeAA)*
· BSC 2
· 70% ethanol
· Paper towels
· Pipettorˆ
· Falcon™ pipette tubes (5ml)ˆ
Methods
A. Preparation of BSC 2
1. Place the materialsˆ into the BSC 2 and arrange them orderly.
2. Switch on the UV light for 15 minutes to ensure sterility of all materials.
3. Switch off the UV light, on the light, run the air circulation and swab the BSC 2 with 70% ethanol.
B. Preparation of RPMI-1640 medium
1. Place the materials* in 37ºC waterbath.
2. Place the materials* into the BSC 2.
3. Pipette 5ml of sodium pyruvate into the pre-made 500ml RPMI-1640 medium.
4. Pipette 5ml of NeAA into the pre-made 500ml RPMI-1640 medium.
5. Pipette 5ml of antibiotics into the pre-made 500ml RPMI-1640 medium.
6. Pipette 50ml of FBS into the pre-made 500ml RPMI-1640 medium.
7. Store the medium at 2-8 ºC and warm up in 37ºC waterbath before any usage.
Function of components:
· Sodium pyruvate- Provide additional source of energy for rapidly-growing cells.
· NeAA- Provides source of amino acid (energy source for cells).
· Antibiotics- Minimises bacterial contamination of tissue culture.
· FBS- Provides essential nutrients to promote optimal cell growth and proliferation
2) Subculturing of cells
Principle
As cells grow and multiply, they tend to crowd together, which is termed as confluency. This can be observed under the inverted microscope where cells are in close proximity. A confluent tissue culture flask suggests the need for subculturing. Subculturing is defined as the inoculation of cells from a confluent flask into a new sterile flask with fresh medium. It allows cells to have more growth surface so as to minimize the competition for growth surface and nutrients. Subculturing is especially important for maintaining the viability, growth and proliferation of anchorage-dependent cells as these cells need to adhere to the surface of the tissue culture flask before they can start growing.
Materials
· 75cm² tissue culture flask (containing HCACs of 80% confluency)
· New 75cm² tissue culture flaskˆ
· RPMI-1640 medium*
· 0.0067M phosphate buffered saline (PBS)*
· Trypsin*
· Inverted light microscope
· BSC 2
· CO2 incubator
· Pipettorˆ
· Sterile 50ml Falcon™ tubeˆ
· Falcon™ pipette tubes (25ml and 5ml)ˆ
· Waste beakerˆ
· Biohazard bag
· Clorox (Bleach)
· 70% ethanol
· Paper towels
Methods
A. Preparation of BSC 2
1. Place the materialsˆ into the BSC 2 and arrange them orderly.
2. Switch on the UV light for 15 minutes to ensure sterility of all materials.
3. Switch off the UV light, on the light, run the air circulation and swab the BSC 2 with 70% ethanol.
B. Preparation of reagents
1. Incubate trypsin and RPMI-1640 medium in 37ºC water bath.
C. Washing of HCACs
1. Remove the 75cm² tissue culture flask (containing HCACs of 80% confluency) from the CO2 incubator.
2. Observe cell confluency (80%) under inverted light microscope.
3. Swab the 75cm² tissue culture flask with 70% ethanol before placing it into the BSC 2.
4. Swab the materials* before placing them into the BSC 2.
5. Discard the spent RPMI-1640 medium from the 75cm² tissue culture flask into the waste beaker.
6. Pipette 10ml of 0.0067M PBS into the 75cm² tissue culture flask to wash the HCACs.
7. Swirl the 75cm² tissue culture flask gently to facilitate the washing of HCACs.
8. Discard 10ml of PBS into the waste beaker.
D. Trypsinisation
9. Pipette 2ml of trypsin into the 75cm² tissue culture flask to detach the HCACs from the tissue culture flask surface.
10. Incubate the 75cm² tissue culture flask at 37ºC in 5% CO2 for 2-3 minutes.
11. Observe the 75cm² tissue culture flask under the inverted light microscope to ensure the HCACs are detached.
E. Subculturing of cells
12. Pipette 8ml of fresh RPMI-1640 medium into the 75cm² tissue culture flask to neutralise trypsin to prevent damage to the HCACs.
13. Mix the RPMI-1640 medium with trypsin well to ensure all the HCACs can be transferred with the RPMI-1640 medium into a sterile 50ml Falcon tube.
14. Pipette 10ml of mixture (8ml of RPMI-1640 medium and 2ml of trypsin) from the 75cm² tissue culture flask into a sterile 50ml Falcon tube.
15. Centrifuge the sterile 50ml Falcon tube at 20ºC, 1500rpm for 3 minutes.
16. Discard the supernatant into the waste beaker, leaving the cell pellet.
17. Resuspend cell pellet in 10ml of PBS.
18. Centrifuge the sterile 50ml Falcon tube at 20ºC, 1500rpm for 3 minutes.
19. Discard the supernatant into the waste beaker, leaving the cell pellet.
20. Resuspend cell pellet in 10ml of RPMI-1640 medium.
21. Pipette 19ml of fresh RPMI-1640 medium into a new 75cm² tissue culture flask.
22. Pipette 1ml of cell suspension from the sterile 50ml Falcon tube into a new 75cm² tissue culture flask.
23. Incubate the 75cm² tissue culture flask at 37ºC in 5% CO2.
F. End of experiment
1. Deactivate the waste solution in the waste beaker with Clorox.
2. Drain the waste solution into the sink after it turns from violet to colourless and run running tap water for 5-15 minutes.
3. Dispose all the used Falcon™ pipette tubes and paper towels and into the biohazard bag.
4. Swab the BSC 2 with 70% ethanol.
5. Return all the reagents to their appropriate storage areas.
3) Changing of medium
Principle
As cells grow and multiply in culture medium, they produce metabolic toxic waste products and use up nutrients in the medium. Essentially, we want to maintain the viability of cells and thus, the changing of medium is necessary as it restores back the level of nutrients and removes metabolic toxic waste products. An indication of the need to change medium is by observing the colour of the medium. Phenol red is added in the medium to act as a pH indicator. A yellow culture medium indicates the accumulation of metabolic toxic waste products and depletion of nutrients, prompting the need to change medium. A cloudy culture medium suggests possible bacterial contamination and the best action would be to discard the tissue culture flask.
Materials
· 75cm² tissue culture flask (containing yellow culture medium and cells)
· 0.0067M phosphate buffered saline (PBS)*
· RPMI-1640 medium*
· BSC 2
· CO2 incubator
· Pipettorˆ
· Falcon™ pipette tubes (10ml and 25ml)ˆ
· Waste beakerˆ
· Biohazard bag
· Clorox (Bleach)
· 70% ethanol
· Paper towels
Methods
A. Preparation of BSC 2
1. Place the materialsˆ into the BSC 2 and arrange them orderly.
2. Switch on the UV light for 15 minutes to ensure sterility of all materials.
3. Switch off the UV light, on the light, run the air circulation and swab the BSC 2 with 70% ethanol.
B. Changing of medium
1. Remove the 75cm² tissue culture flask (containing HCACs of 80% confluency) from the CO2 incubator.
2. Swab the 75cm² tissue culture flask with 70% ethanol before placing it into the BSC 2.
3. Swab the materials* before placing them into the BSC 2.
4. Discard the spent RPMI-1640 medium from the 75cm² tissue culture flask into the waste beaker.
5. Pipette 10ml of 0.0067M PBS into the 75cm² tissue culture flask to wash cells.
6. Swirl the 75cm² tissue culture flask gently to facilitate the washing of cells.
7. Discard 10ml of PBS into the waste beaker.
8. Pipette 20ml of fresh RPMI-1640 medium into the 75cm² tissue culture flask.
9. Incubate the 75cm² tissue culture flask at 37ºC in 5% CO2 for 2-3 minutes.
C. End of experiment
1. Deactivate the waste solution in the waste beaker with Clorox.
2. Drain the waste solution after it turns from violet to colourless.
3. Dispose all the used Falcon™ pipette tubes and paper towels and into the biohazard bag.
4. Swab the BSC 2 with 70% ethanol.
5. Return all the reagents to their appropriate storage areas.
In conclusion, subculturing of cells and replacement of medium is essential for maintaining the viability of cells. Alright, that is all for now! I hope my post is comprehensive and if there is any query, please feel free to ask.
Thankz! =)
Tan Han Yang
0606190G
TG01
Saturday, July 12, 2008
Week 3 SIP - Pilot Food Catering Tech Plant and my beloved MP
Heya guys, hope you all have been enjoying your SIP because i have. I have been attached to the Pilot Food Catering Plant and have started my SIP this week. I am sorry i cannot share any recipes with you guys because it is a trade secret .
There are many jobs to do in a food technology plant. You will have to help the chefs prepare ingredients, perform baking of pastries, grinding of cashew nuts, labeling of food containers, sieving of flour, cracking off eggs, packaging of cakes, maintenance of machines, cleaning the facilities and greasing the baking trays. And this is only the 1st week of my attachment there!!
The preparation of ingredients is very important in baking a premium pastry or cake. Hence it is very imporant to get your measurement units right. A kilogram does not equate to a gram of sugar. Imagine adding a kilogram of sugar into your pastry... YUmYUm.
After the baking proccess and the finished product is achieved(hopefully it turns out well), the TSO and i will have a food tasting session. We will sample the quality of the food and a checklist will be evalutaed. The checklist consist of gradings from 1 to 5 and is very important to gauge the quality of the food before it can be moved to Bristol to be sold. These checklists will not be only given to us, but also to the rest of the students from the Food science and culinery courses for their remarks. Basically the checklists will ask questions on the texture (soft, hard), taste (sour, bitter, sweet, sour), colour (pale, dark, brown), enjoyment (enjoyed eating, feel like puking) and further remarks on how i can be improved. All the checklists wil be gathered and keyed into the computer (not LIS) and tabulated using Excel to find the average response to the food. If the average pertains to liking the product (majority), the cakes/pastrieswill be packaged and labeled before shipped across to the Bristol to be sold.
My Mp involes developing a protocl for zymogram and i briefly explain the principles of a zymogram.
Zymography is a type of electrophoresis technique using SDS-PAGE. It is different from the usual electrophoresis, as it is copolymerised with a substrate (usually geltain or caesin) Why this 2 substrates? Most proteases and periplamic proteins are able to digest there 2 substrates and this allows us to measure and detect the enzyme activity. Another difference for zymogram and normal electrophoresis is that the sample buffer is prepared without boiling and adding of reducing agent such as B-mecapethanol. This is because we do not want to denature the protease and periplasmic proteins as we want them to breakdown the substrate to detct the enzyme activity. After electrophoresis, Triton X-100 is added for the renaturation process and incubated in the digestio buffer for the reaction to take place.Later the zymogram is stained with coomassie blue stain and will show up as clearings/halos whereby there is digestion of periplasmic proteins to the substrate have taken place.
Thanks for reading my entry, have a great MP/SIP ahead
From: Benjamin MA
Class: TG01
0606181F
Date: 12/07/08
Saturday, July 5, 2008
Week 2 SIP - Xcise Machine
Name of topic: Xcise
Introduction to the Topic: My MP involves the analysis of Stenotrophomonas maltophilia’s periplasmic proteins. Periplasmic proteins are proteins that are found between the the inner and outer cell wall. The study of these proteins are important as it could be potential drug targets in the future. During the course of this study, quite a number of machines would be needed.
The machine im going to blog about in this entry is the Xcise machine
So what is Xcise? Xcise is an automated gel processor that is useful in processing proteins that are to be identified by mass spectrometry. Its functions ranges from acquisition of gel image to the spotting of protein sample onto a MALDI target plate. Before we can use Xcise, 2-D gel electrophoresis should be performed 1st.
2D gel electrophoresis: Proteins are separated twice during gel electrophoresis. For the 1st dimension, proteins are separated using an IPG (Immobilized pH Gradient) strip according to their isoelectric point. The proteins move horizontally. For the 2nd dimension, proteins are separated using a pre-casted gel based on their molecular weight. This time, proteins move vertically downwards.
Isoelectric point: Isoelectric point is a characteristic of the protein whereby it corresponds to the pH at which the protein is neutrally charged. This means that the proteins will migrate on the IPG until it reaches the pH of the strip, whereby the protein is neutrally charged.
Mass Spectrometry: A technique used to identify and sequence proteins by measuring the mass-to-charge ratio of proteins that are converted to ions. The instrument used to measure the mass spectrum is called MALDI-TOF (Matrix Assisted Laser Desorption Ionization-Time of Flight).
Matrix compound: A compound that is required to control the energetics of the desorption/ionization process.
After a gel is run, proteins are already separated based on their isoelectric point and molecular weight (2D gel). Proteins separated would appear as spots on the gel. The protein spots would then be stained for visualization and a gel image is acquired. After the gel is stained, we would want to identify the proteins. Before running the proteins through MALDI, the proteins would need to be removed from the gel, digested into peptides and then spotted onto a MALDI target plate.
Outline of Xcise’s in-gel digestion procedure
1. Gel image is acquired and spots to be cut are selected
2. A cutting head will cut out the gel containing the protein spots and place them into wells
3. The gel will then be destained and dehydrated
4. Trypsin is added to digest the proteins into peptides (note that the proteins are still within the gel)
5. Sample is then incubated for 4-6 hrs at 37oC or 16-18 hrs at 30oC
6. As buffer used contain salts that will affect the subsequent analysis of peptides in MALDI, peptides would need to be desalted
7. Peptides are then eluted using ZipTip. ZipTip is different from a normal pipette tip as it contains a resin at the tip. Peptides would bind to the resin during the process of desalting
8. The peptides are then spotted onto a MALDI plate together with a matrix compound
9. The MALDI plate can then be placed in MALDI and peptides can be analysed
LMQA (How can excise be helpful?)
Using Xcise is an example of lab automation. If the process is to be done manually, it will be very tedious and time consuming. For the cutting of gel, the lab technician would need to measure diameter of the protein spot, before cutting a pipette tip so that the hole corresponds to the diameter. The pipette tip will then be used to cut the gel. During cutting, the gel would be lodged inside the tip and would have to be taken out using a pointed end. This makes cutting extremely difficult. Steps 3-7 would need to be done manually too by adding and removing the required solutions manually.
For the spotting onto MALDI plate, lab technician would have to spot onto the plate one by one. One spot will be placed in one eppendorf tube so if there are 100 spots, there will be 100 tubes to be processed and 100 spots to be spotted onto the plate. This may lead to fatigue and air bubbles in the sample may be produced. However, if Xcise is used, the cutting of gel would be faster and more precise, hence decreasing the amount of varaitions. At the spotting stage, Xcise can spot 8 samples at a time, which is much faster and accurate than doing it manually. Contamination of the sample is also greatly minimized. Even though the machine and the consumables are very expensive (1 ZipTip costs about $2, and 8 ZipTips will be used at a time), it can greatly improve the efficiency of the lab due to its importance in maintaining the integrity of the sample.
Posted by: Ma Xianwei Benjamin
Class: TG01
10.15am
05/July 2008
Friday, July 4, 2008
Week 2 SIP (Ivan)
I am posted to the biochemistry/clinical chemistry section of my lab for 2 weeks. For this 2 weeks, I have been doing 2 kinds of major test on EDTA-coagulated blood specimens. One is G6PD and the other is HbA1c Quantitation. I will be putting up a post regarding HbA1c Quantitation.
At the end of my first week, I have learnt a new constituent in the blood, which can be tested. It is HbA1c or Glycosylated (or glycated) hemoglobin. Glucose in the blood stream will normally be attracted to the haemoglobin part at the lysine molecule of the RBC to form glcosylated haemoglobin. Thus the amount of HbA1c is directly proportional to amount of glucose, meaning that if there are more glucose present in the blood, the more HbA1c will be present in the blood. It’s a known fact htat RBC has a half-life of about 3 months before they are replaced by the spleen. Hence by measuring the percentage of HbA1c in the blood, we can determine how high the patient’s blood glucose has been on average over the last 3 months.
Currently HbA1c is the best suitable way to monitor the progress of medication for patients suffering from diabetes mellitus. It is also able to determine the appropriate dosage quantity of anti-diabetic drugs do administer to patients so as to effectively reduce glucose blood level and reduce possible side-effects.
I am now working in a company who uses a machine manufactured in Japan to quantitate in percentage the amount of HbA1c in the blood specimen. Me as a lab technician,I am required to load the blood specimen manually. However before loading the blood specimen, I am instructed to shake and mix well every blood specimen and it is important to remove any air bubbles present using a disposalable plastic pipette. This is becase the machine has a laser to detect the level of blood in the tube,it will not go all the way to the bottom to aspirate blood. Thus presence of air bubbles will give false level of blood detection, causing inaccurate amount of blood aspirated, in the end causing false results.
The principle of my company’s machines is as follows; the concentration of HbA1c and the concentration of total haemoglobin in the blood sample are measured separately, and then the ratio is reported as percentage of HbA1c. A latex agglutination inhibition method is used for measurement of specific HbA1c. The total haemoglobin is then measured using the toral haemoglobin reagent where all derivatives are converted into alkaline hematin in an alkaline solution of a non-ionic detergent.
By Ivan Ng
TG01
0605070B
11.40pm
4 July 2008 (Friday)
Subscribe to:
Posts (Atom)